Rank Math SEO is one of the most powerful SEO plugins for WordPress, competing with giants like Yoast SEO or even All in one SEO. With over 3 million active installations, it offers an incredibly robust free version and a Pro version for advanced features. For my part, since I tested it, I decided to move my new sites to Rank Math SEO, because I find that it is the SEO tool which is both the simplest and most accomplished for WordPress.
But be careful, install an SEO extension on your site does not mean that you will occupy the first places in search engine results, far from it. This is why I sought to learn How to properly configure an SEO plugin for WordPress.
In this tutorial, I will provide you with the fruit of more than 15 years of experience in SEO, and guide you step by step to install, configure and use Rank Math in order to make it the best ally for your SEO, but also so that you can move up in the rankings recommendations from artificial intelligence like ChatGPT, Gemini or even Grok, because as I explain in my Guide “SEO for AI”, it is no longer just about optimizing your SEO for search engines, but also for Artificial Intelligence.
🧭 This article is a chapter of my guide “Optimizing your SEO in the age of AI”.
📘See all chapters
Whether you opt for the free version of Rank Math SEO or the Pro version of the plugin, I will explain everything to you so that the configuration is a breeze, and so that you can implement a relevant SEO strategy adapted to your situationWhether you're a blogger, online store owner, or marketer, I hope this guide helps you boost your SEO!
In this tutorial, I will focus mainly on setting up my site TulipWork. To contextualize the example, this is a site where I offer SaaS solutions for entrepreneurs, including an inventory management tool for retailers and an invoice management tool with a financial dashboard. The objective is therefore to increase the audience on this site via natural referencing, and to generate leads. By taking this example, you will be able to get inspiration and depending on your situation (news site, online store, personal blog, etc.), you will be able to adapt all of this to your own SEO strategy.
This article may contain affiliate links. I only recommend tools that I use, like, and find truly useful. Your support helps me continue to offer free, quality content. Thank you!
Fan of the WordPress ecosystem? Discover the best of my articles on WordPress as well as my WordPress extensions to make your site shine!
1. What is Rank Math SEO?
Rank Math SEO is a WordPress plugin all-in-one designed for optimize your site's SEOLaunched in 2018, it quickly established itself as a serious alternative to Yoast SEO and All in One SEO thanks to:
-
A free version available for free download on their website, and which is already rich in features.
-
A Pro version with advanced options like keyword tracking, AI support, and automated Schema Markup. I personally opted for the Pro version of Rank Math SEO for my restaurant brand in Paris, and I highly recommend it if you want to optimize your site's SEO as much as possible, although the free version will already allow you to get started effectively.
-
Overall, an intuitive interface and integration with tools like Google Search Console and Google Analytics.
Rank Math is light, fast and compatible with Gutenberg, Elementor, WooCommerce and much more. Whether you run a blog, a showcase site, or an online store, it simplifies SEO optimization and allows you to implement a real SEO strategy.
2. Installing Rank Math (Free Version)
Step 1: Install the Rank Math plugin on your site
Click here to download the latest free version of Rank Math SEO. Then install the plugin on your WordPress blog.
After activating the plugin, Rank Math invites you to create a free account (required for certain features, such as Google Search Console integration):
-
Click on Register Now.
-
Enter your email address or log in via Google/Facebook.
-
Click on OK, Activate Now to activate the plugin.
Trick : This account is reusable for other WordPress sites, which is useful if you manage multiple projects.
3. Initial Setup with the Setup Wizard
Rank Math offers an intuitive setup wizard to quickly configure the plugin. Here's how to do it:
Step 1: Launch the Wizard
-
After activation, you will be redirected to the wizard. Otherwise, go to Rank Math SEO > Dashboard > Setup Wizard.
-
Choose between three modes:
-
Easy : Default settings for beginners. If you're short on time, choose this mode, and you can always come back to it later.
-
Advance : Access to all settings (recommended for this tutorial).
-
Custom (Pro) : Reserved for Pro users.
-
Step 2: Import Settings (Optional)
If you are using another SEO plugin (Yoast, All in One SEO), Rank Math can import your existing settings:
-
Select your current plugin (eg: Yoast SEO).
-
Click on Start import.
-
Verify that the import is complete (100 %), then click Continue.
Step 3: Configure Basic Settings
The wizard guides you through several tabs, and the first step, which may seem trivial, can actually be more complicated than it seems. Indeed, it relies on something called Schema Markup. But before we go any further, here's a quick explanation of what Schema is, so that things are completely clear for everyone.
What is Schema Markup?
Schema markup is a type of code added to the HTML of a web page to help search engines better understand its content. This is a standardized vocabulary, supported by Google, Bing, Yahoo and Yandex, which allows you to structure the data on a page explicitly.
For example, if a page talks about a restaurant, the schema markup can clearly indicate their name, address, opening hours, customer reviews, etc. This allows search engines to display this information in enriched form in the results (such as “rich snippets”).
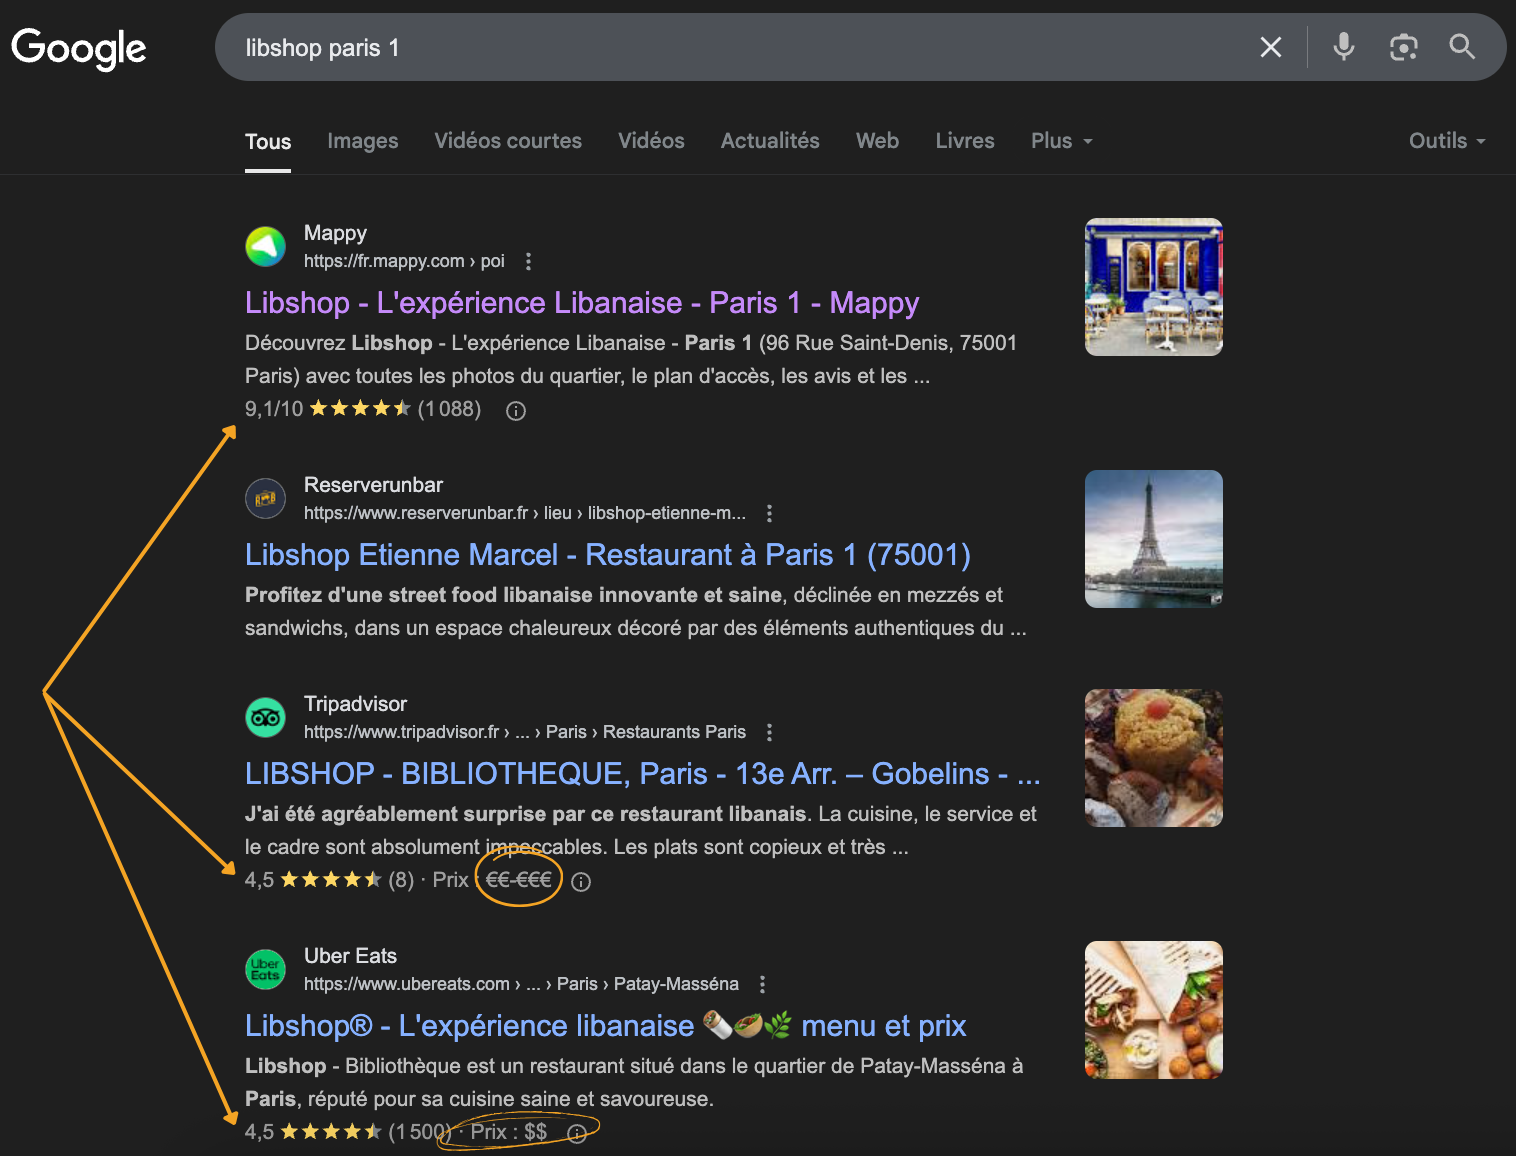
The goal is therefore twofold: to improve how search engines understand the content and to increase the visibility and appeal of pages in search results. This can concern articles, events, products, recipes, people, and many other types of content. Each page can contain its own Schema markup.
Schema markup often relies on the JSON-LD format, recommended by Google because it's easy to implement without impacting the visible structure of the page. And that's precisely what Rank Math SEO will help you do, starting with your site's global Schema tag.
Type of Site
At this stage, you must therefore indicate whether your site is a blog, a shop, a portfolio, etc. This step is important because Rank Math adds the appropriate metadata for Google. In the example below, it is possible to choose Small Business Site (My TulipWork site sells services in general, aimed at an online audience, not at a local level). However, this is a choice that is debatable, because I can also choose "Other Business Site", and refine with a subcategory, for example "Organization", which is the most global subcategory. But in the case of a news site, a personal portfolio, a physical store or an e-shop, you must be careful to enter the correct category.
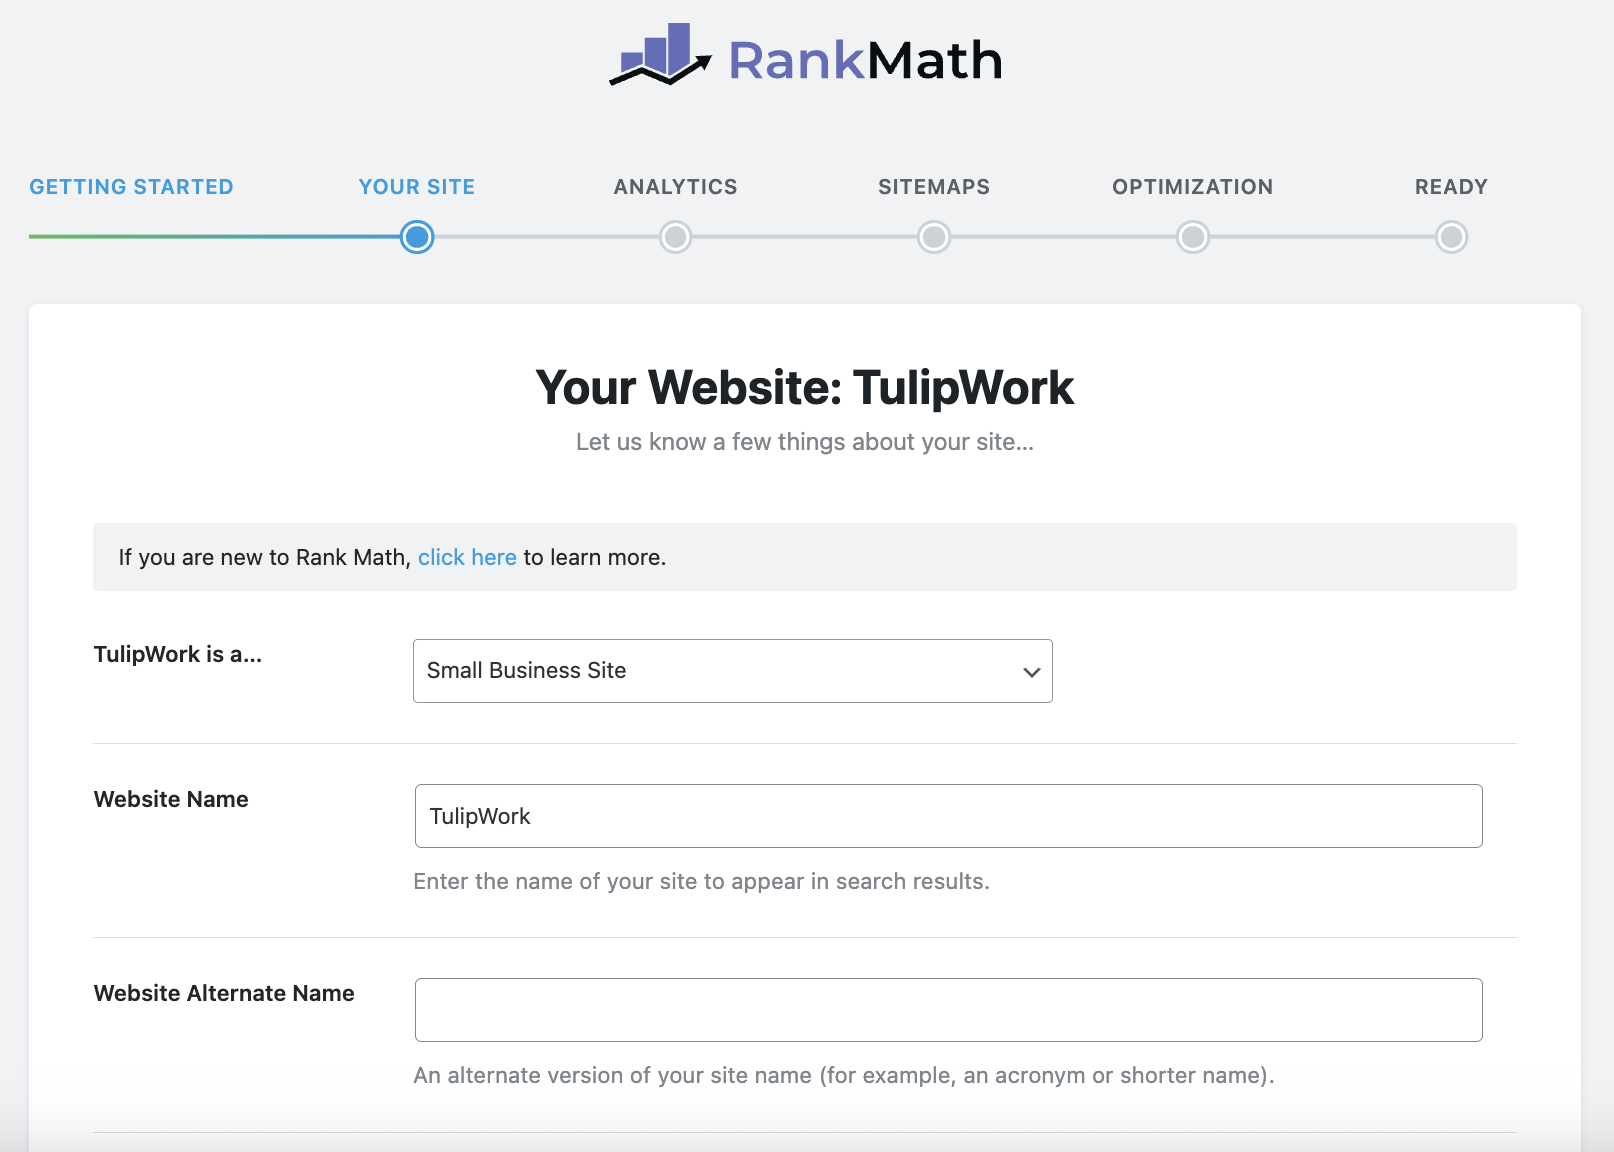
Here's some advice to help you choose the right category for your site, to best help search engines classify what you do:
| Kind | Description |
|---|---|
| Personal Blog | Suitable for personal blogs, where you share your knowledge and experience |
| Community Blog/News Site | For news sites and other newspaper-type publishing platforms |
| Personal Portfolio | To present your achievements and highlight your skills |
| Small Business Site | Sites to improve the online presence of small businesses |
| Webshop | For e-commerce sites, where you sell products and services online |
| Other Personal Site | Personal sites that do not fit the types listed above |
| Other Business Site | Professional sites that do not match the types listed above |
Actually, there are two main ways to rank a site according to Rank Math SEO and search engines:
- On one hand, “Business” sites: Community Blog/News Site, Small Business Site, Webshop & Other Business Site.
- On the other hand, “Personal” sites: Personal Blog, Personal Portfolio & Other Personal Site.
If your site is a “Business” type site, by selecting one of the “Business” categories, other options will then appear on the screen, allowing you to indicate to Google what type of business you represent, except for the “Small Business Site” type.
This step can be very confusing for most users, because since there is a closed choice to make, this choice can be reductive, and it is sometimes difficult to find the category that corresponds to your site. Aside from local businesses, where you simply need to enter “Other Business Site” and then choose the area of activity, or even online stores, where you simply have to choose “Webshop” and then choose the most relevant subcategory, the choice is more difficult for sites that are at the crossroads of several domains, and which offer content, an online store, and services for sale.
For example, in the case of one of my sites where I keep a healthy eating journal including free articles and paid content, it is difficult to categorize the site in a clear and transparent way, because this site is a mix between a personal blog on nutrition, a community blog with members, and a business site (small or other) which sells member access to premium content.
For this site, I could have chosen "Local Business > Diet Nutrition," but this isn't a local nutrition clinic. So, I finally opted for "Community Blog/News Site," with the "Organization" subcategory, to keep it as general as possible while still signaling to search engines that this is indeed a community-focused blog.
This setting is important because the information you enter here will be injected into the Schema, for better thematic understanding.
To help you make your choice, here are some ideas.
Regarding “Personal” sites:
- If you are a blogger and you publish mostly "blog" type content, like a journalist for example, or a researcher, then you can opt for "Personal Blog".
- If you're a musician, graphic designer, or someone who generally needs to showcase their work, choose "Personal Portfolio," even if you're selling your services.
- If you're working on a personal site that's neither a blog nor a portfolio, choose "Other Personal Site." This could be a sort of "link tree," an editorial grab-bag, an "about" page, a simple contact page, etc.
Regarding “Business” sites:
1. Small Business Site
✔️ For whom?
- Craftsmen, consultants, therapists, freelancers
- Small businesses with an online presence, a simple showcase site or a “linktree” type site
- However, I do not recommend choosing this category for physical stores or local services, because I prefer a category that allows you to enter the "Business Type", which is not the case here.
📌 Features:
- Clear business objective
- Presentation of services/products
- Often a few fixed pages + blog
🧩 Examples:
- nathaliecoaching.com → Life coach with contact form and testimonials
- studio-graphik.fr → Freelance graphic designer with a portfolio and service offers
🛒 2. Webshop
✔️ For whom?
- E-commerce sites, dropshipping, WooCommerce store
- Sale of physical or digital products
📌 Features:
- Product sheets
- Shopping cart, order tunnel
- E-commerce legal pages
🧩 Examples:
- lavieenvert.bio → Sale of organic food supplements online
- cours-guitare-en-ligne.com → Sale of downloadable video training courses
- ateliercéramique.fr → Boutique of artisanal creations
🧑💼 3. Other Business Site
✔️ For whom?
- Physical businesses (restaurants, coffee shops, hairdressers, banks, etc.)
- Companies or organizations that do not fit into the “small business” or “webshop” categories
- Personal brands or companies with a hybrid or complex activity
📌 Features:
- Commercial activity, with a physical presence and an easily recognizable field of activity
- B2C, B2B, or institutional
🧩 Examples:
- musika-londres.com → London-based music school
- logiciels-xyz.com → Showcase of software or IT services sold via subscription
🏢 4. Community Blog / News Site (yes, this category is also available on the “business” side)
✔️ For whom?
- Online media, collaborative blogs, magazines, thematic blogs (IT, affiliation, etc.)
- Sites with regular editorial production (monetized or sponsored)
📌 Features:
- Multi-author or frequent publications
- Traffic and visibility objective
- Possible monetization via ads or subscriptions
🧩 Examples:
- journaldesstartups.fr → News from young tech companies
- bienetremag.com → Online magazine on well-being, with advertising and affiliation
- thegoodlife.fr → Collaborative blog about a high-end lifestyle
- tulipemedia.com → Blog dedicated to entrepreneurs
It is therefore important to understand the subtleties related to this step, because there are a few points that can generate confusion. For example, the “Other Business Site” category may seem like a somewhat catch-all secondary category, but However, this is the right option to customize the exact type of your business in the Schema markup, and it is the one that is most suitable for a physical business like a restaurant for example.
The Schema subcategory is important for local SEO because Google better understands the nature of the business (and can display it in rich results with icons or relevant data like hours). So, for a general SaaS site like my SaaS TulipWork, it may be appropriate to opt for "Small Business Site" or "Other Business Site" by choosing a general subcategory like "Organization", but for a hairdresser who has a physical and localized business, then “Other Business Website” will be much more relevant because we can select a sub-Business Type, in this case “Hair Salon”.
2. OpenGraph Logo and Image : Add a logo (min. 160×90 px) and a default image for social media sharing (1200×630 px).
-
Google Services : Connect Google Search Console and Google Analytics to track performance directly in WordPress. Authorize the necessary permissions. The good thing about this step is that Rank Math SEO takes care of everything, no need to configure anything, even if you haven't yet created a property on Google Analytics for example. You can also enable "Email Reports" to receive reports by email every week, which I recommend.
-
Sitemap : Enable XML sitemap to help search engines crawl your site. You can exclude categories/tags to avoid duplicate content.
-
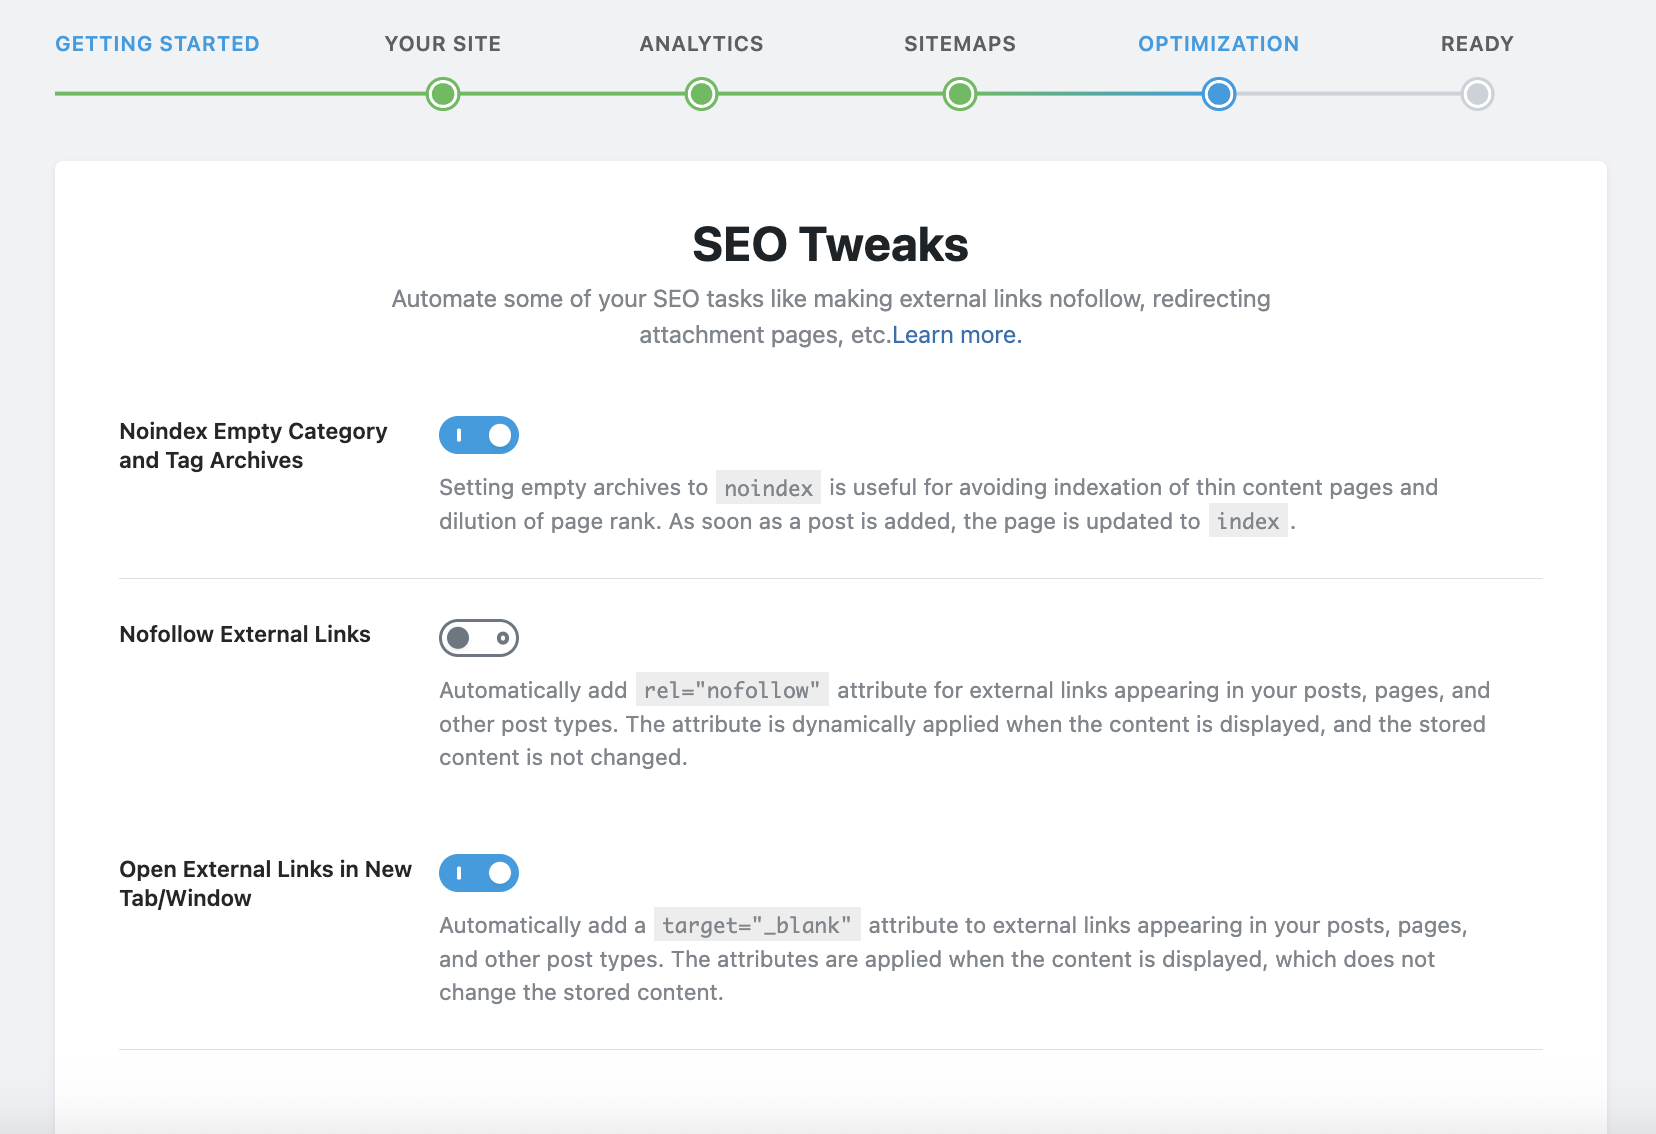
SEO Tweaks : At this point you can enable "Noindex Empty Category and Tag Archives", which will not index category and archive pages that are empty.
-
External Links : You can enable or disable the option to make external links “nofollow” by default (in order to save “SEO juice”), but I don’t necessarily recommend it.
-
Social Media : Add your Facebook and Twitter profiles to enrich the metadata.
-
404 Monitor : You can enable it to track any 404 pages that visitors land on from search engines.
-
Redirections : Combined with the previous option, this option will allow you to configure URL redirects to the correct pages.
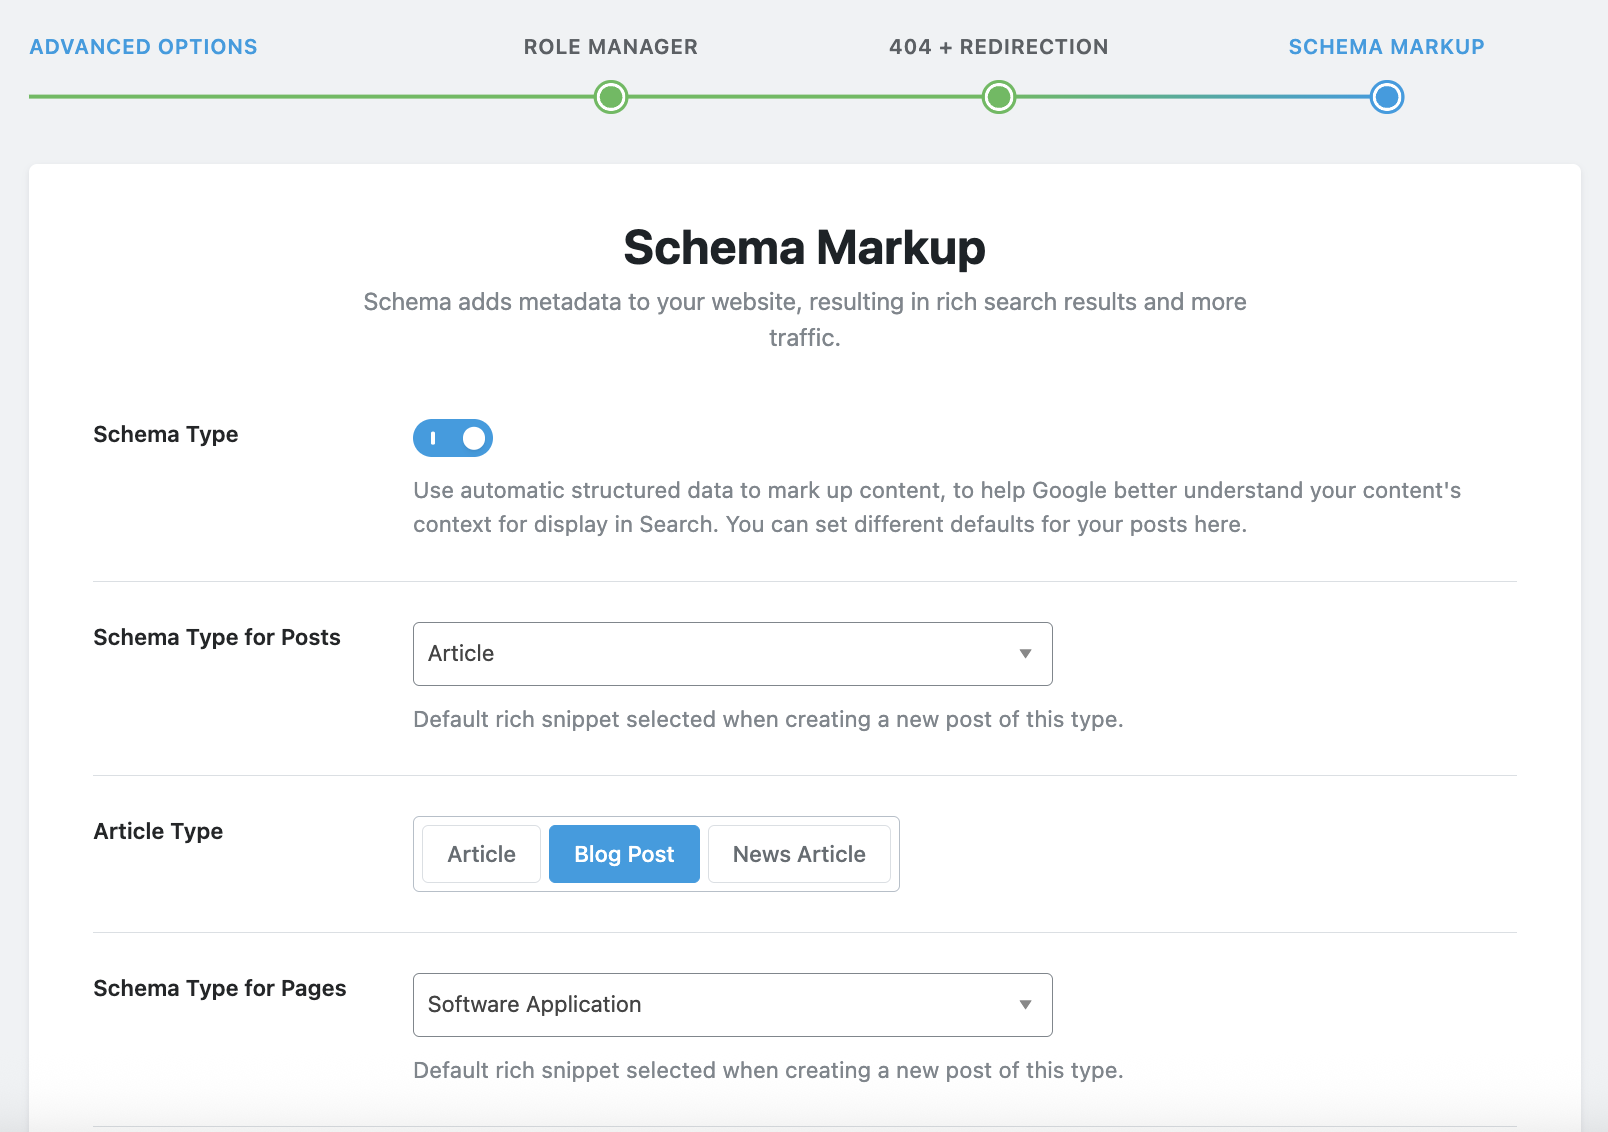
- Schema Markup : You will need to be precise regarding this setting, because it is what will indicate to search engines but also to AI what exactly your site does. In my example below, it is a site that sells SaaS solutions, so I entered "Software Application" in "Schema Type for Pages" because the pages of my site are dedicated to the promotion of my IT tool, and I left "Articles" in "Schema Type for Posts", because the articles contained in my blog are blog articles, quite simply.
Step 4: Save and Finish
-
Click on Save and continue at every stage.
-
When finished, click on Back to dashboard.
Trick : If you skip the wizard, you can manually configure the settings in Rank Math SEO > General Settings.
4. Key Features of the Free Version
The free version of Rank Math is incredibly comprehensive. Here are the essential features, which you can enable or disable from the Dashboard page:
- 404 Monitor : To monitor 404 errors.
- ACF: To exploit the data provided by custom fields created with the extension ACF for WordPress. If you don't know what it is and you don't use this plugin, there's no point in activating it at this point.
- AMP: To add the necessary SEO tags to the AMP version of your site, with the plugin WordPress AMP, which is an extension that allows you to offer a super smooth mobile experience on smartphones. Again, if you are not using AMP, there is no need to enable this module.
- Analytics : To display the most important information about your Google Analytics property directly in your WordPress dashboard with Rank Math, I recommend activating this module.
- bbPress and BuddyPress: To optimize the SEO of your bbPress forums or your BuddyPress social network, for those who use these types of tools. If you don't have a forum on your site, you can leave this module disabled.
- Image SEO : To automatically add ALT tags and titles to the images displayed on your site. This module is especially useful for those who have a lot of images and don't have the time to optimize this type of data. For those who have a new site and want to customize the images with each upload by giving them optimized titles and tags, there is no need to activate this module.
- Instant Indexing : Allows you to notify search engines of new content, to be activated.
- Link Counter : To activate.
- Local SEO : This option is extremely useful for those who have a local business and need to optimize local SEO. I'm thinking in particular of boutiques, restaurants, coffee shops, and all physical businesses. However, if, for example, you have an online news website, or you are an international SaaS, I suggest you disable this module to avoid misleading search engines.
- Redirections : to manage 301 redirects in particular, particularly useful when URLs are modified.
- Schema (Structured Data) : This must be activated to optimize your SEO; we will come back to this a little later in this tutorial.
- Role Manager: Only if you want to delegate Rank Math SEO settings to other users of your WordPress installation.
- SEO Analyzer : To activate because this tool will be very useful to help you optimize settings, correct errors (e.g.: missing tags, broken links).
- Sitemap : Enable to help search engines crawl your site's content, even the most remote pages.
- Google Web Stories: Only enable if you use the Google Web Stories plugin, which is used to create immersive formats on your website. With this module, your Web Stories will be optimized for SEO.
- WooCommerce: Must be activated for those who have a store with WooCommerce, in order to optimize the SEO of products sold in their online store, particularly via Schema Markup.
Now that we've covered the different modules of Rank Math SEO, let's get down to business by learning how to configure the plugin's settings.
4. Rank Math SEO General Settings
In the general settings of Rank Math SEO, here are the main settings to make:
- Strip Category Base : allows you to remove /category/ from the category URL. While this doesn't necessarily have an SEO impact, it does at least make category URLs cleaner and simpler for visitors, which could indirectly improve SEO. This is a cosmetic activation that you can do at your convenience.
- Redirect Attachments : by activating this option, you avoid diluting your SEO with unnecessary pages that WordPress is likely to generate when you click on an image in particular.
- Breadcrumbs : to be activated if your theme does not natively provide a breadcrumb trail, which is very useful both for your readers and for SEO.
- Webmaster Tools: Here you can enter verification codes for Google Search Console and other online tools, but if this has already been done elsewhere, there's no need to do it again here.
All other settings are presumably set correctly by default, and with some exceptions, there's no need to change them. Now it's time to focus on SEO optimization.
5. Titles & Meta
Here, you'll be able to refine your SEO strategy. Here's a quick overview of the options. I'm only detailing the options that require modification, or those that may seem complicated, to save you time. For example, I won't detail the options displayed on the "Social Meta" page, which simply involve filling out your social media profiles.
Global Meta
These are the default SEO settings for all pages on your website, unless otherwise specified later. This is where you tell Rank Math SEO which rule you want to apply by default.
Here are the settings I recommend:
- Meta Robots: leave it on “Index” by default, in order to reference the maximum number of pages.
- Advanced Robots Meta: Leave the default options, already optimized.
- Noindex Empty Category and Tag Archives: As previously stated, there's no point in indexing archive pages that are empty. And we might even consider indexing archive pages in general.
- OpenGraph Thumbnail: Upload a default image as a fallback guide in case no featured image is provided, nor any OpenGraph image, especially for social networks.
Local SEO
When the "Local SEO" module is activated, additional options will appear in the "Local SEO" tab, where you will be able to enter the official physical address of your business, for example, the address format to display, the type of organization, opening hours, telephone number, and many other information particularly useful for a local business.
This information is very important for search engines, and must correspond exactly to what is reported elsewhere in directories and other sources, so that search engines can return the information as easily as possible to Internet users.
Home page
Here, you'll be able to optimize the SEO of your homepage, in the case where no static page is specified as the homepage. However, for the sake of brevity, we'll cover this step later in this tutorial, based on a static homepage.
Post Formats
This page allows you to configure the SEO settings of the publication format archives (post formats). Post formats are a native WordPress feature that allows you to categorize posts into specific types (e.g., Standard, Image, Video, Quote, Link, etc.), in addition to tags and categories, provided your theme supports these formats.
We are talking here about the format archive pages and not the articles themselves. For my part, in the site that I chose to illustrate this tutorial, I chose by default not to reference the format archive pages, because I do not find them relevant from an SEO point of view, just like the archive pages in general, as well as the tag pages because I prefer to concentrate the audience coming from search engines directly in my final content (homepage, pages and articles) rather than in the intermediate archive pages that I reserve for the readers of my sites who navigate directly on my websites.
However, I allowed search engines to index my category pages because it seemed relevant in my specific case, but don't panic, I'll come back to this later in this article.
Additionally, there are some of my sites where I have chosen to let the engines index the category and tag pages, and I will also come back to how to make a choice a little later.
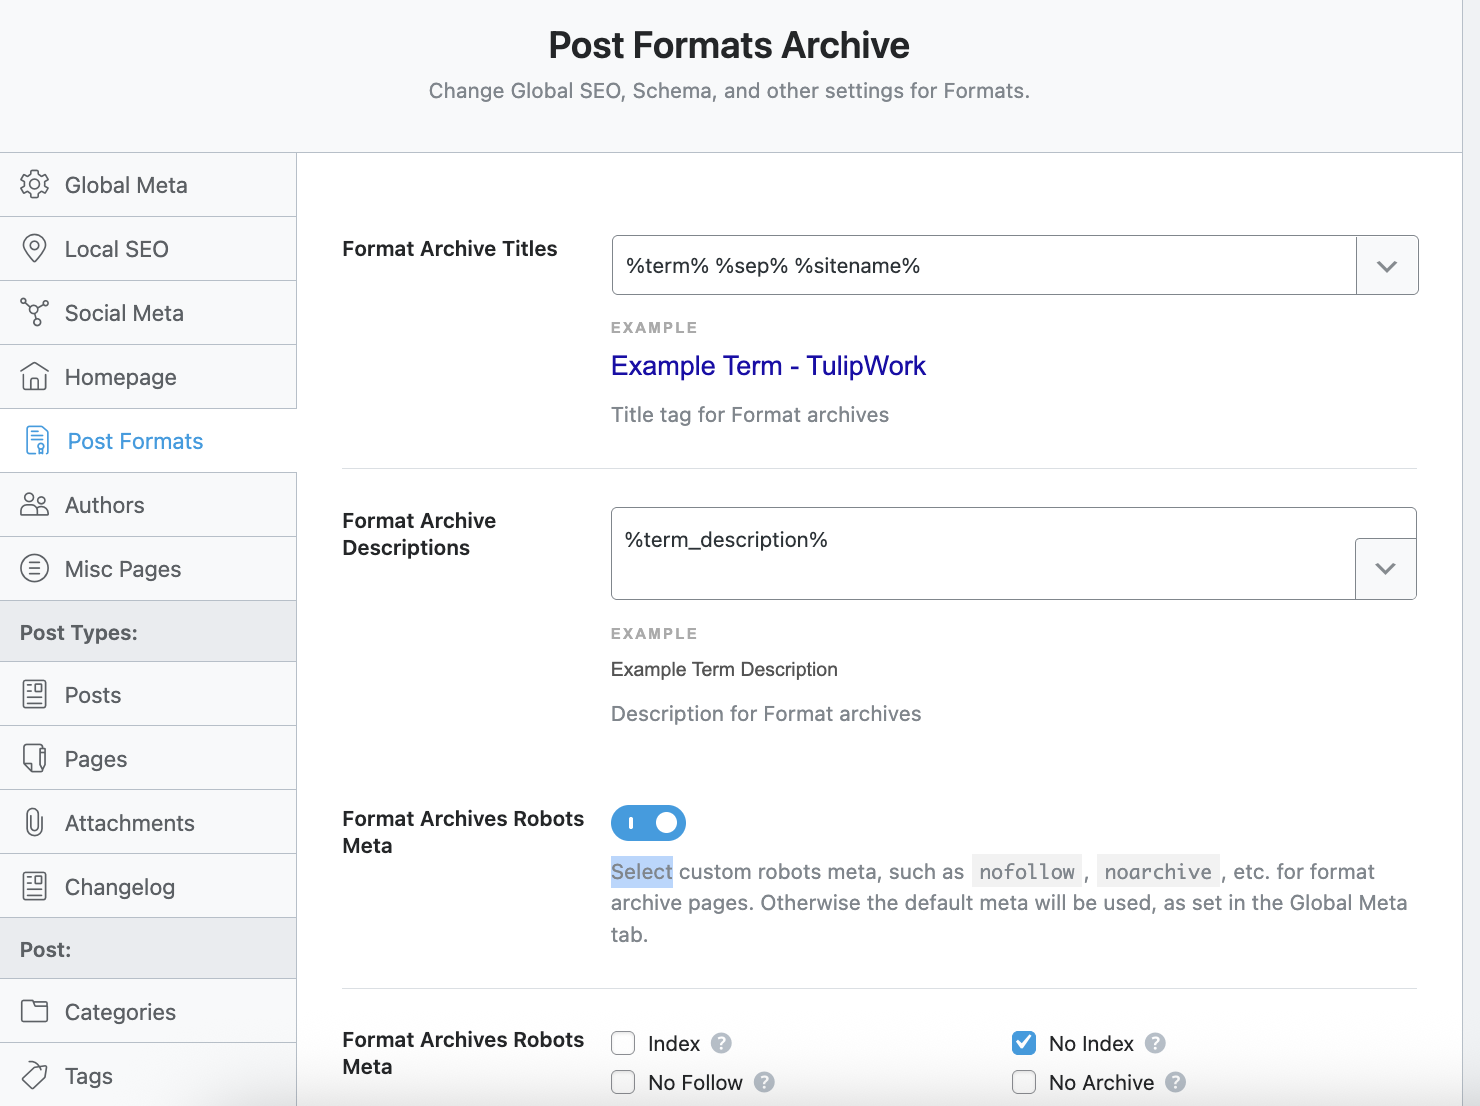
So I enabled the "noindex" option here.
Authors
When it comes to author pages, you have two choices:
- Either you activate them and set them up an SEO strategy for author pages, useful if your site hosts several authors, and you want to offer an experience to your authors by “making them stars” with a real page dedicated to them and which would be well positioned on search engines.
- Either this isn't a topic for you, or you're the sole author on your blog, in which case you can disable author pages to avoid diluting your SEO.
Misc Pages
Here, you will be able to refine your SEO strategy regarding various pages such as the 404 page, archive pages classified by date, sub-pages or even paginated pages.
For my part, I chose to simply disable the date-based archive pages (example: mysite.com/2025/06/) because I don't want to provide my content sorted by date.
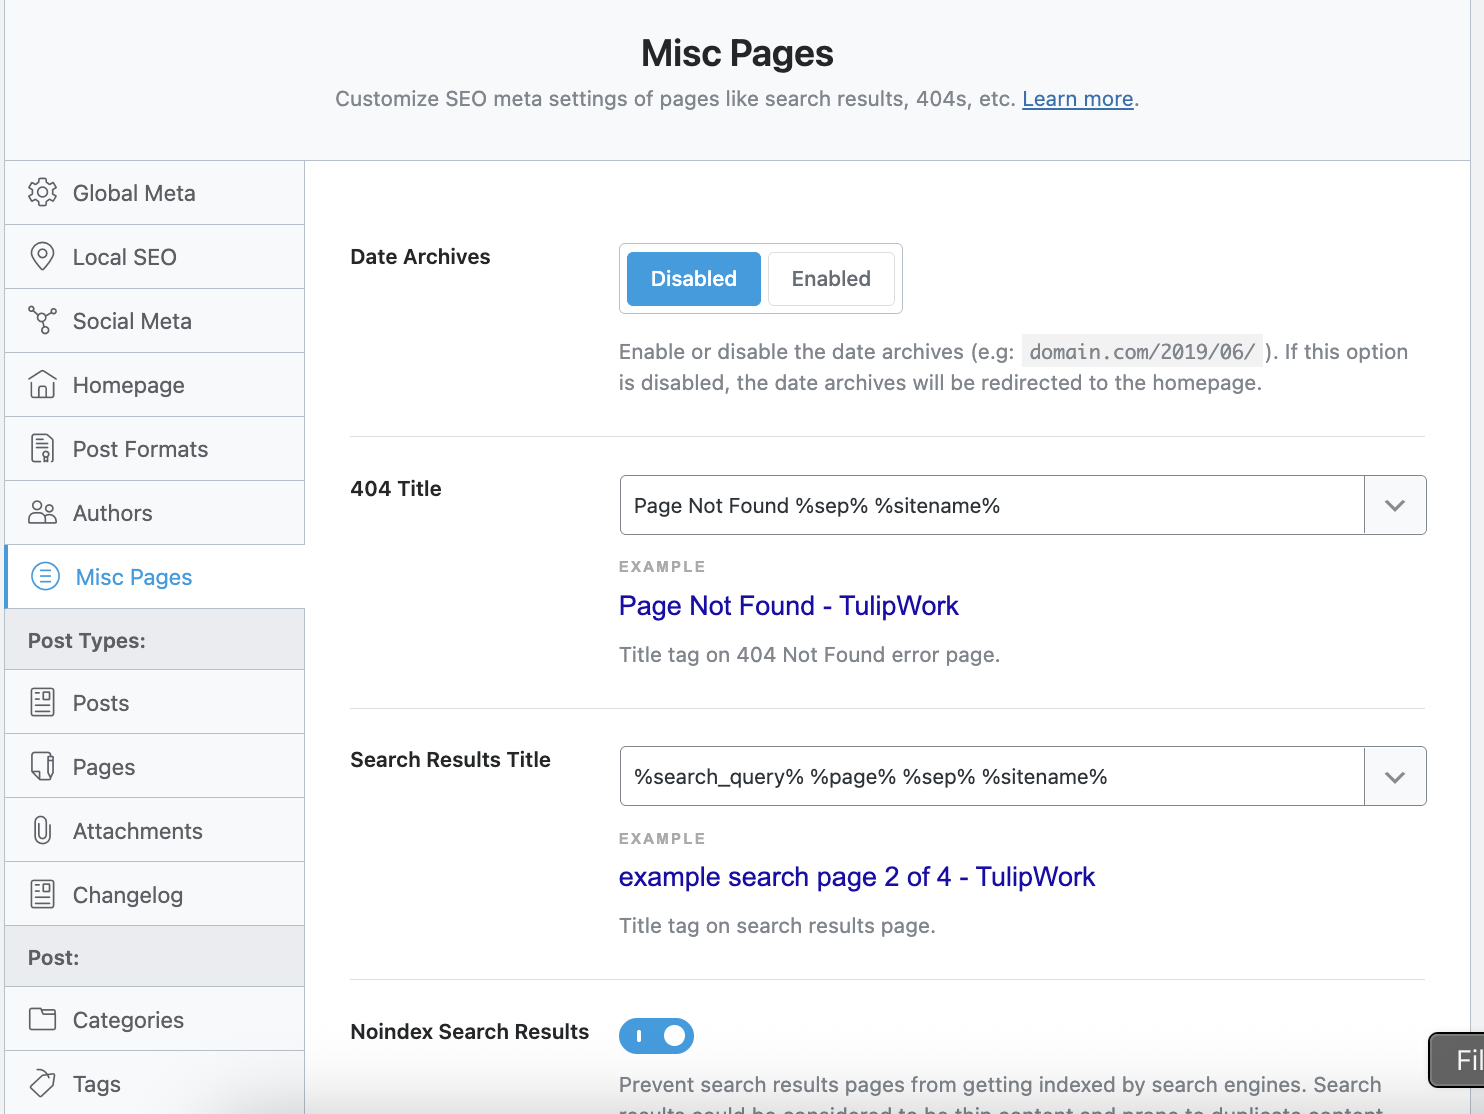
However, here again, I insist on the fact that this is a personal choice, and some content creators specifically publish content that could be relevant to present by month, for example. In such a case, it is entirely possible to activate the archives by date, and optimize the SEO of these dates. I am typically thinking of a researcher who might want to propose his scientific research by month and by year in order to temporalize his content since search evolves over time. This shows that implementing your SEO strategy depends on several factors, and it cannot be duplicated identically by everyone.
Also on this page, you can choose not to index search results (which is what I chose to do for my sites), but again, it's a matter of context. If your site is a (deliberate) grab-bag where access to content is primarily via search, then it would be possible to index search results.
Posts
This is probably the most important setting for a blog, since it relates to the options related to the articles you will publish on your WordPress blog. I'm going to describe one of the possible SEO strategies for articles, which is generally replicable on pages, but again, it's all a matter of context.
- Single Post Title : It is the title that will be displayed to search engines, and the idea is to choose from the tags offered by Rank Math SEO. In my case, I simply opted for %title%, the idea being to focus everything on the titles of the articles, without superfluous elements in my case. However, it all depends on your strategy, if you want to promote a strong brand, whose name is important to you, it could be appropriate to start on %title% %sep% %sitename% for example, to highlight the name of your site. This can also be relevant if your site has a good image whose name is already known, and this name is a key conversion factor pour les internautes. Vous pouvez également renseigner %currentyear% ou %date(F jS, Y)% de façon à toujours faire valoir un contenu récent, si celui ci est à jour. Plusieurs stratégies sont donc possibles, et il n’y a pas de bonne réponse.
- Single Post Description : like what was previously said for Single Post Title, I simply opted for %excerpt% but again, anything is possible in terms of strategy, and it's up to you to think about what you want to highlight in the meta description of your articles.
- Schema Type : Since these are your blog posts, you can go with "Article." However, if your blog is actually a way for you to publish courses online for example, choose “Course”. Similarly, if your articles are actually chapters of a book that you publish as a blog, then choose "Book". Same logic for job offers, concerts, etc. You must enter the Schema Type that corresponds to what the article in question is supposed to represent. If, on the other hand, you use a Custom Post Type for everything that is "event", "concert", "chapters of a book", and your blog only serves to relay your personal or commercial news, leave "Article" and customize the Schema Type of your Custom Post Type in the dedicated options.
- Headline : this is the title that will be declared in the Schema structured data. By default, the tag entered is %seo_title%, who is the final content generated for the title in “Single Post Title”. If for example in "Single Post Title" you have entered "%title% %sep% %sitename%, then %seo_title% will take that, and you can add other tags to it. For my part, I chose to leave %seo_title%, which simply takes %title%.
- Article Type : Choose “Article” for general and informative content, “Blog Post” for creative and personal content, “News Article” for news articles.
- Link Suggestion Titles : This option allows you to configure how Rank Math generates internal link suggestions for your articles, either from your article titles or from the focus keywords that you manually enter for each article. I personally left this option on "Titles".
Pages
The page options are identical to those for posts, it's up to you to configure them as you see fit. In my case, for example, I deliberately entered "Software Application" in "Schema Type" for Pages, unlike Posts, because my Pages are presentations of a digital tool that I sell under license, while my Posts are purely informative articles. This is an example to explain that you must configure the Rank Math SEO plugin according to your own SEO strategy and your own needs, and not apply settings from elsewhere to the letter.
Attachments
Regarding image attachment pages, I simply disabled them so as not to lose the visitor (and lose SEO) on pages that I consider useless in my case. However, again, in certain very specific cases, attachment pages will be useful for certain content creators who would like to classify their media by page, either by referencing them in search engines via the "index" option, or by disabling their indexing by putting a "noindex" while allowing visitors to consult the media page. Again, it's all a question of context.
Post Types
In Post Types, you will be able to configure the Custom Post Types, again by refining the configuration according to your needs, the context and your SEO strategy, using the same logic as what was done for Posts and Pages, and adapting it to your specific situation.
For example, in my case, I have a Post Type “Changelog”, added by the plugin CBX Changelog & Release Note, which allows you to view the changelog of my extensions that I provide as SaaS on my site.
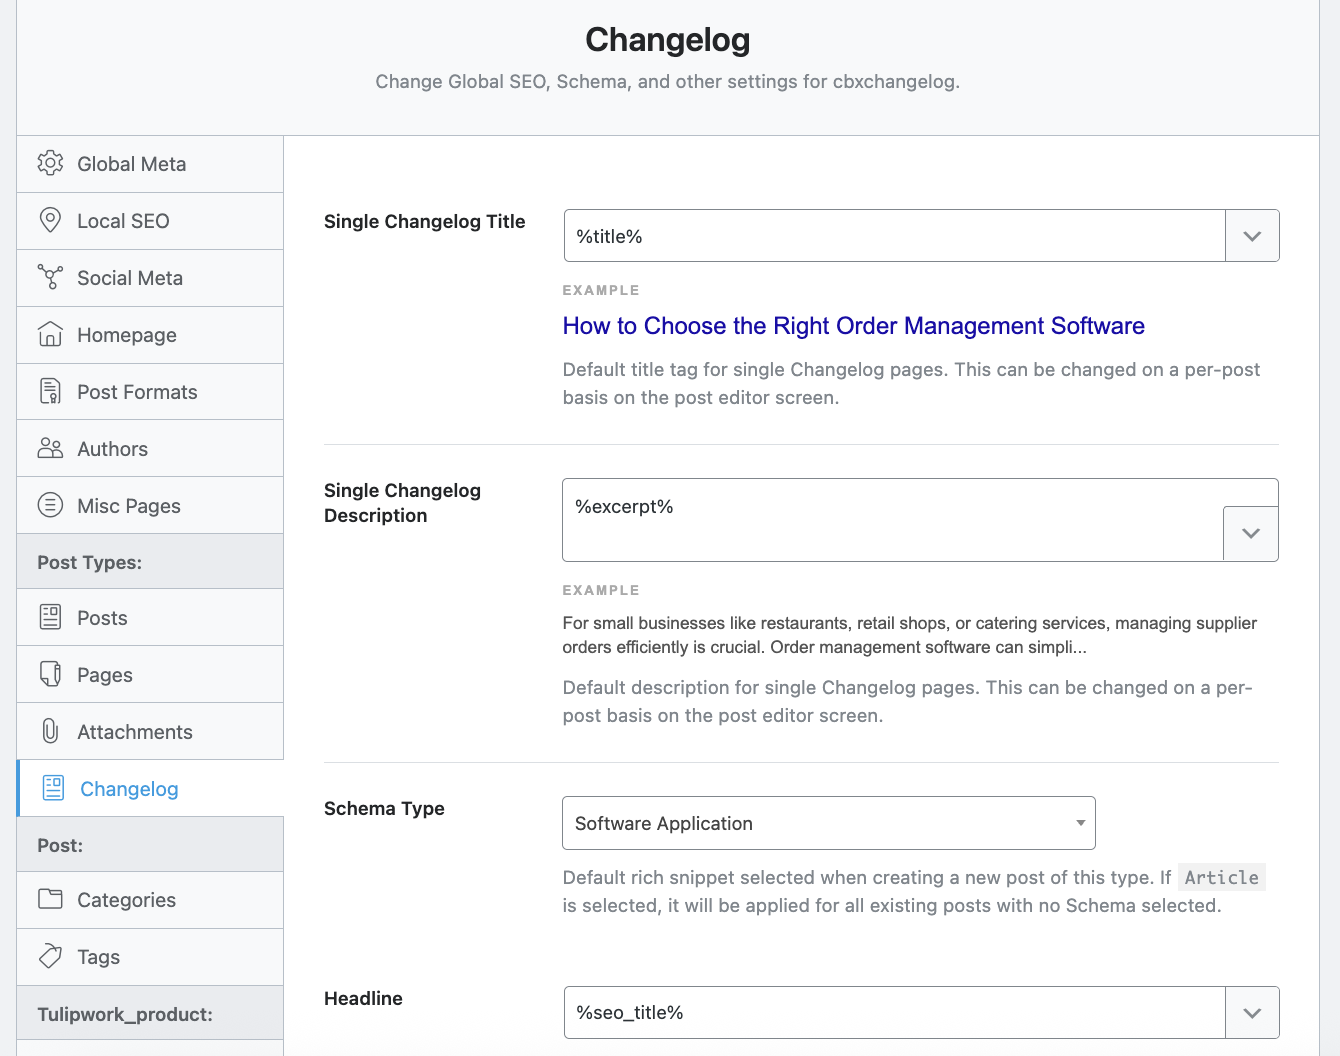
Well, in the settings for this Post Type in Rank Math SEO, I indicated that I want %title% to be the official title displayed in search engines, %excerpt% the meta description, "Software Application" the Schema Type, and I chose to disable "Changelog Robots Meta", which amounts to applying the global indexing settings, namely "index", without any particular customization, because I wanted search engines to index my changelog, which includes all the features added over time to my WordPress plugins.
Categories and Tags
In these settings, you will be able to decide what you do with the category and tag pages, and this is again a very personal choice, which will depend on your intention.
For my part, I decided to optimize the indexing of my categories in the site chosen to illustrate this tutorial, because these constitute real cover pages which reference my articles by theme, and all of these articles and these categories constitute in some way a guide.
To do this, I chose to display %term% as the category title, %term_description% as the description of each category, and I therefore of course deactivated "Category Archives Robots Meta" so that this is the global indexing parameter that applies to my Category pages.
But be careful, this requires having well-optimized categories, with well-chosen titles, and a description for each category. Finally, each category must contain articles related to the theme chosen for the category, so as to have a clear and relevant tree structure.
Conversely, I decided not to reference the Tag pages, because I don't have a relevant theme – in my case – that is assembled in the form of tags. On the contrary, for many of my websites, Tags are limited to a way of filtering content based on format, or editorial line, but not really a theme that is relevant in terms of SEO, but again, this will depend on each site.
I insist on the fact that if you choose to reference the tag or category pages, it is important to "take care" of these pages, by naming them in a relevant way, by classifying the articles concerned in them, and by refining the page to make it understandable by the Internet user, otherwise you risk degrading your SEO.
If, for example, you have gathered all the articles of a theme within a page, and you list these articles either manually or using an extension such as Display Post Types, then it is not relevant to index both this page which serves as a sort of thematic summary, and the dedicated category which groups these same articles, unless you say that the dedicated page and the dedicated category are complementary.
Example, on this blog, I have this guide to SEO for AI which brings together all my articles dedicated to this subject, and it is a page. I also created a tag “SEO for AI” which I have absolutely not optimized, and which is not intended to be indexed on search engines, because this tag classifies the articles from the most recent to the oldest, and I prefer to keep control of a timeless and ordered presentation in my own way since it is a guide.
Conversely, if you have a celebrity news blog for example, and you have categories on one side (Gossip, Music, Cinema, Couples, etc.) and tags on the other (which I would tend to use for celebrities, for example Mariah Carey, John Travolta, Timothée Chalamet), then it is relevant not to create a dedicated page for these personalities because it would be time-consuming work and, in addition, since news is by nature linked to a temporality, it is more relevant to display the articles from the most recent to the oldest for each personality, than to want to create a timeless page for this personality.
The ideal would therefore be, for each personality page, to have a photo, a short biography and the latest news articles with pagination, and a newsletter so as not to miss anything from this personality, for example. All this while indicating to search engines to properly index these personality pages, of course.
6. Sitemap Settings
On this page, you'll be able to configure your Sitemap. A Sitemap is a map of your site, which can be useful for helping search engines crawl your site.
Normally you can leave the default settings, including:
- the value entered in “Max number of links on each sitemap page.” which allows the content of the Sitemap to be divided into several pages;
- the inclusion of images and featured images.
Furthermore, it is also possible to enable an HTML Sitemap, therefore visible on your site, but I will not dwell on this option which is a priori not essential, unless you really want to display your sitemap. When this option is disabled, it does not prevent search engines from taking into account the "real" Sitemap, which is the XML Sitemap previously configured.
Still in the Sitemap settings, you can configure whether or not to include posts, pages, media attachment pages, custom post types and other taxonomies, but normally, there is nothing special to do, because these settings take what you have entered in terms of indexing (index or noindex).
7. Instant Indexing
On this page, you will be able to manually submit URLs to certain search engines, and automate submissions for articles, pages, media, and other custom post types.
8. 404 Monitor and Redirects
On these pages, you will discover any 404 pages that your visitors may have already encountered, and set up temporary or permanent redirects to rectify the situation.
9. SEO analyzer
This is where the most fun part of the Rank Math SEO plugin lies, as the SEO analyzer will analyze your site's homepage and provide you with improvement tips.
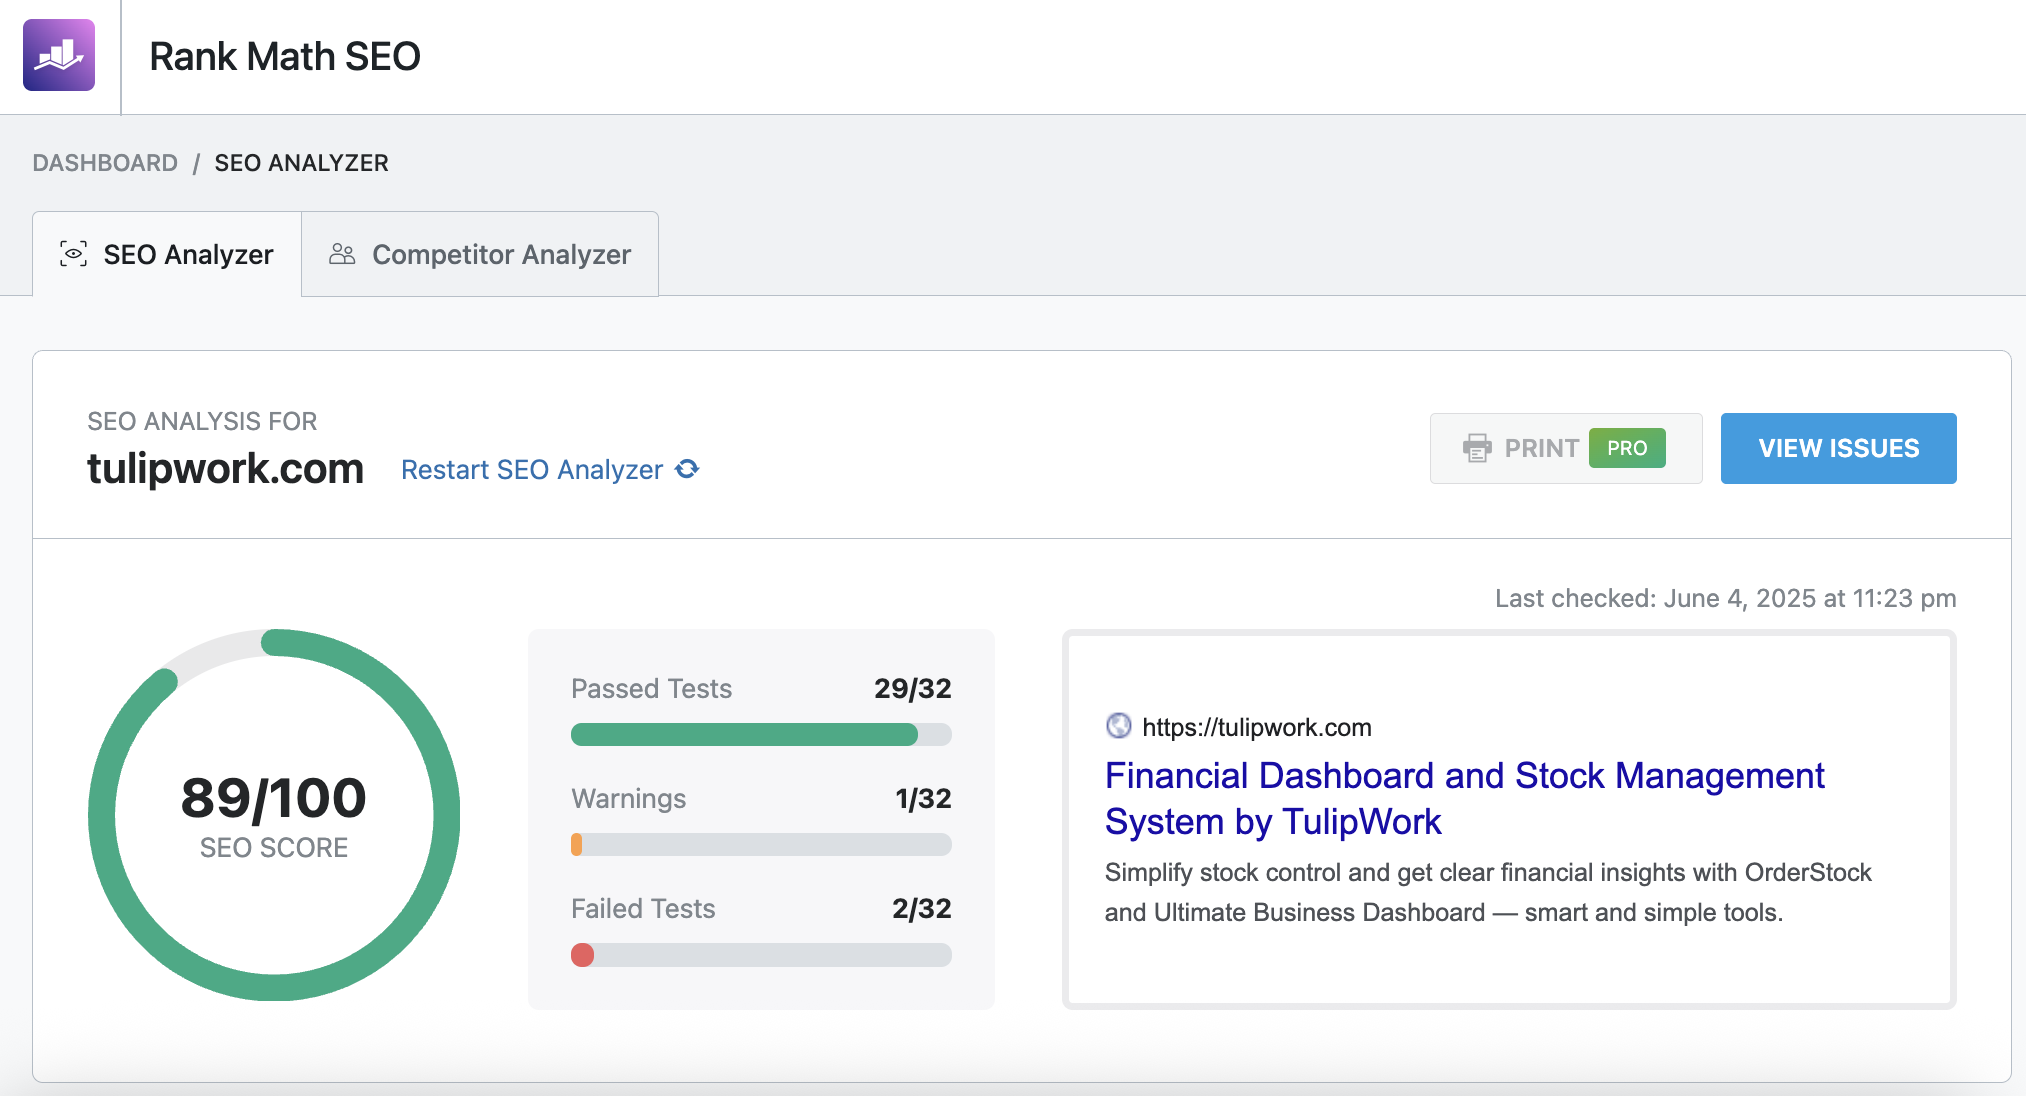
At this stage, it's not complicated, you consult the Warnings and the Failed Tests, and on a case-by-case basis, you act to rectify the situation.
10. Optimizing an article or page with Rank Math (Free)
Optimize an article with Rank Math is simple and intuitive. To guide you in a completely comprehensive way, here is a practical example, still using the example of my SaaS site.
For example, I chose to show you the page that illustrates the features of one of the tools that I sell on this site. This is an inventory management tool for entrepreneurs and retailers. The example will therefore be telling, because it is a question of ensuring that the page, which is in some way a landing page, is optimized as much as possible for SEO.
Step 1: Add a Focus Keyword
Once your page or article is written, it's time to review the different possible optimizations that Rank Math provides, starting with the focus keywords stage, i.e. the important keywords to communicate to Rank Math.
Contrary to what one might think, the focus keyword(s) are not taken into account by the engines. In fact, it is a tool that allows you to tell Rank Math what the target topic of the article is, so that Rank Math can help you optimize the article according to this objective. I have long considered this tool as secondary, but it can actually help optimize SEO, because it behaves like a benchmark, and above all, it allows Rank Math to tell you what to optimize based on this target keyword.
So the idea here is to first define the main keyword that could define your page, the one you are aiming for, the one that could summarize your content. It is sometimes a difficult exercise. Once you have found this focus keyword, all you have to do is enter it into the editor provided for this purpose.
-
Create or edit a post in the Gutenberg editor.
-
In the right sidebar, open the tab Rank Math SEO.
-
In the field Focus Keyword, enter your main keyword (eg: “best WordPress SEO plugin”).
-
Rank Math automatically suggests related keywords through Google. Add up to 5 keywords to be your secondary keywords.
In my case, I chose the following keywords:
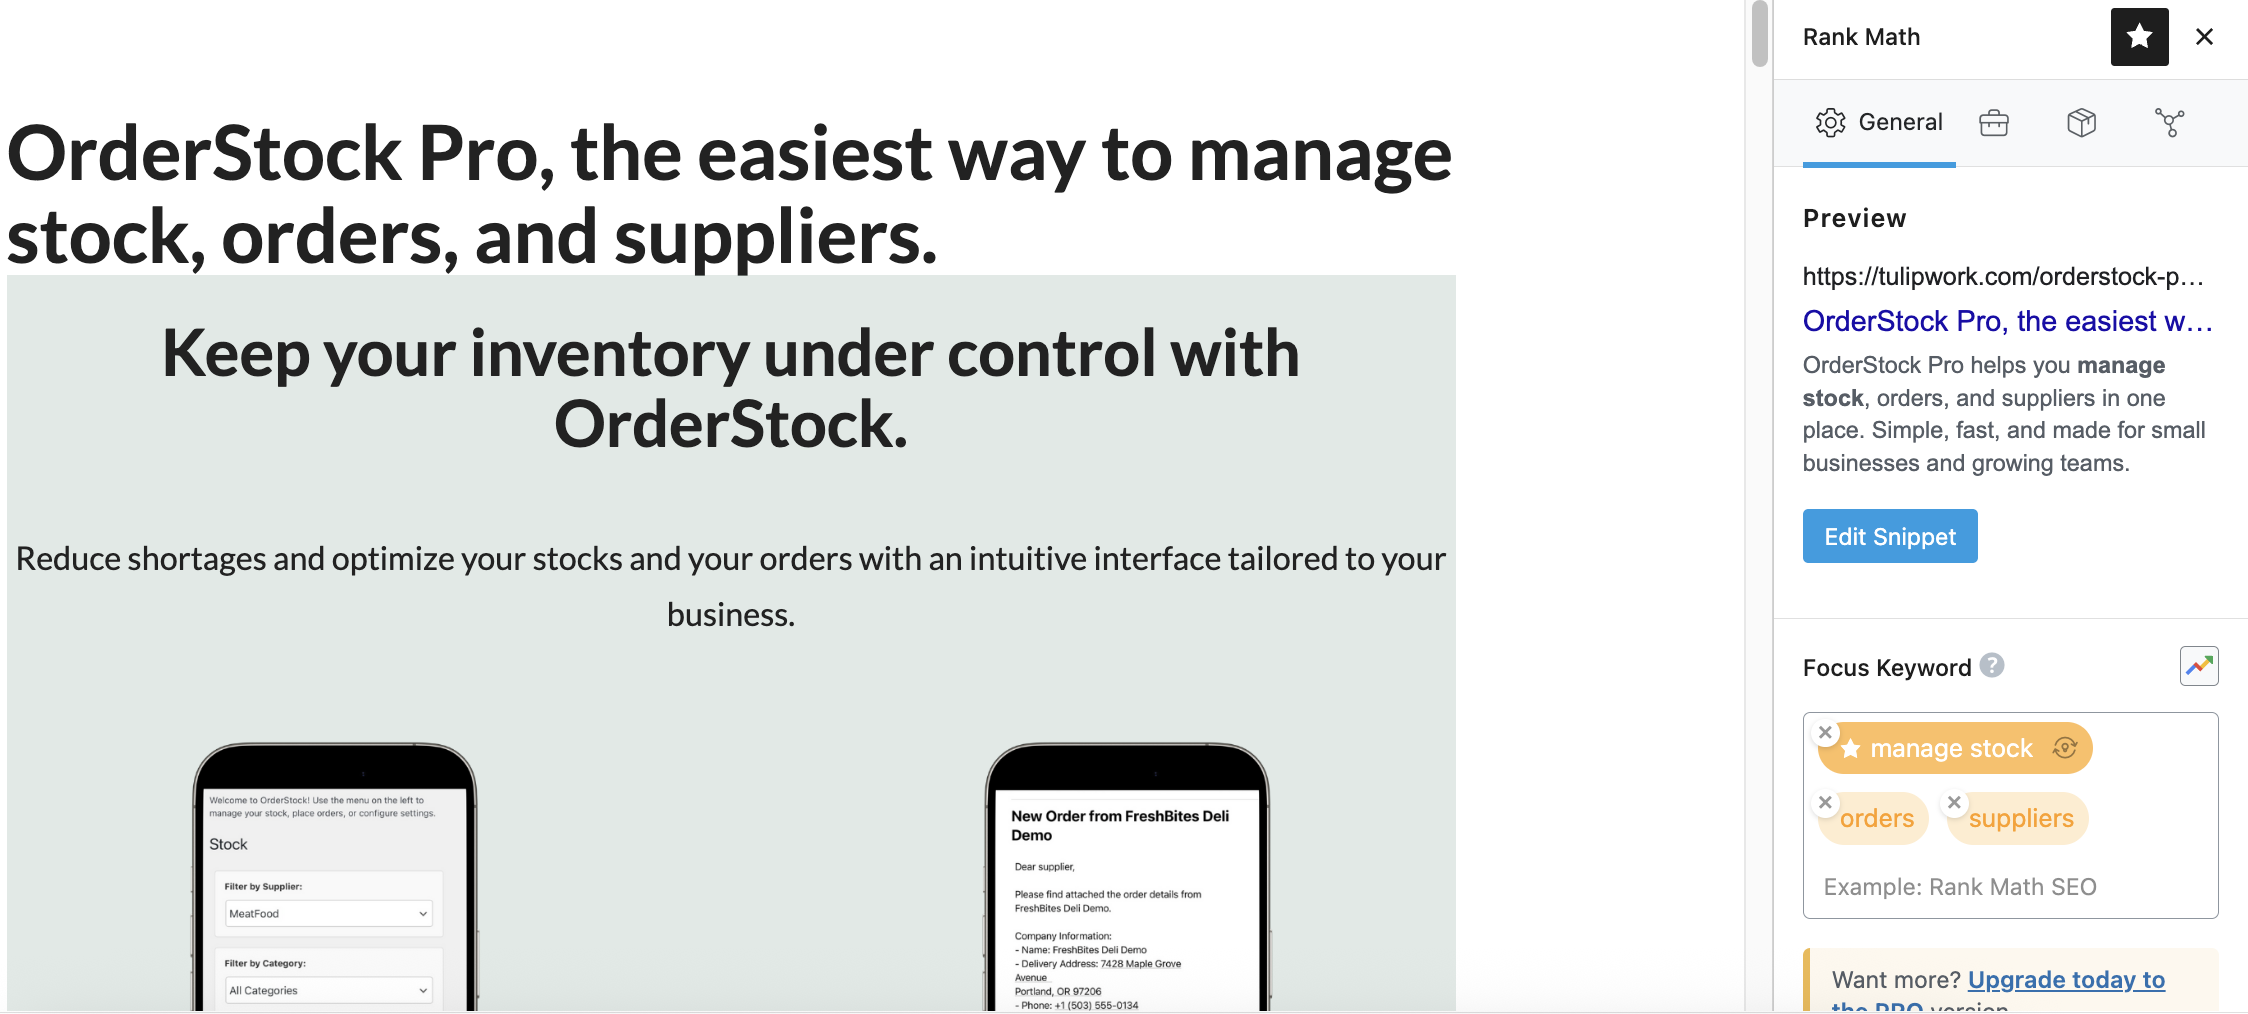
Indeed, my tool is primarily designed to manage inventory, and secondarily to place orders with suppliers. "Manage inventory" is therefore the main keyword.
Step 2: Optimize the Title and Meta Description
Again, before Rank Math SEO, I tended to optimize my blog post titles to a minimum, but not necessarily the pages. In the example chosen here, I initially started by putting only the name of the tool (i.e., OrderStock Pro) as the page title. But this title is not at all optimized for SEO.
With Rank Math SEO, I realized that I needed to optimize this title. How? Thanks to the focus keyword. Because by entering "Manage Stock" as the focus keyword, Rank Math told me that this target keyword wasn't included in the page title. So I replaced "OrderStock Pro" with "OrderStock Pro, the easiest way to manage stock, orders, and suppliers." We could be even more greedy by choosing "Manage stock, orders, and suppliers effortlessly with OrderStock Pro," which allows us to focus on the tool's features rather than its name.
To change the title, you don't need to do it in the Rank Math SEO options, but rather directly in the title of your article. However, you can still do it in Rank Math if you want a custom title specifically for SEO.
In addition to the title, it is important to provide a meta description. The meta description is an HTML tag ( ) which provides a summary of the page's content. It is often displayed in search results (SERP) under the page title.
Either the first lines of your article or page are already very well-informed and optimized for SEO, or it is wise to customize a meta description.
Define a meta description A meta description in Rank Math SEO (or any other SEO plugin) that differs from the actual text on the page is neither inherently a problem nor automatically a benefit. It depends on how the meta description is written, how well it aligns with the page content, and how it impacts user experience and SEO.
A meta description that restates or complements the page's content (while remaining true to its topic) can be a plus. But it's not mandatory; it all depends on the context.
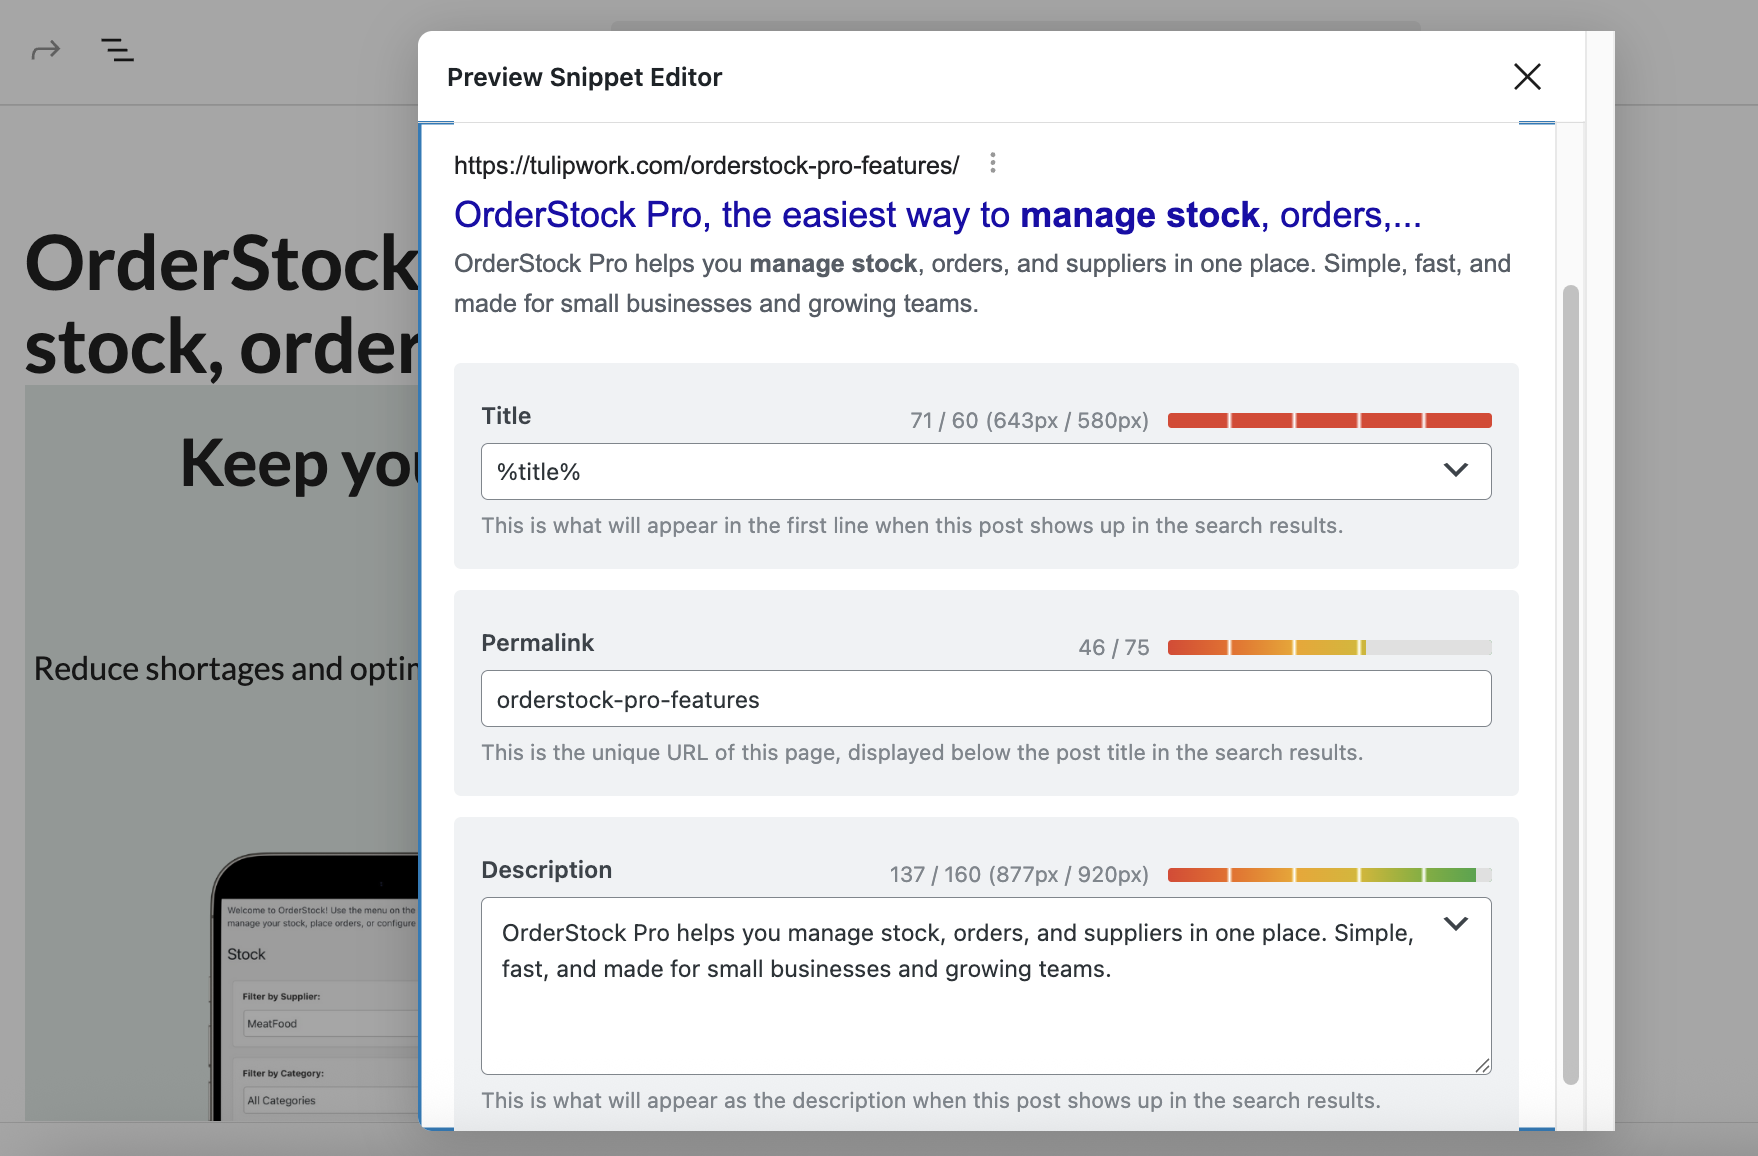
As for the meta description, here's how to optimize it:
-
Click on Edit Snippet in the tab General.
-
Write an SEO title (max. 60 characters) and a meta description (max. 160 characters) including your keyword.
-
Preview the appearance in Google (desktop/mobile) via the icons in the top right.
Step 3: Follow the Recommendations
Rank Math assigns a SEO rating (0 to 100) to your item. To improve your score:
-
Use the keyword in the title, meta description, URL, and first paragraph.
-
Add internal links to other articles on your site.
-
Insert images with ALT attributes containing the keyword.
-
Maintain a reasonable keyword density (1-2 %).
Here for example are the recommendations made by Rank Math in my case:
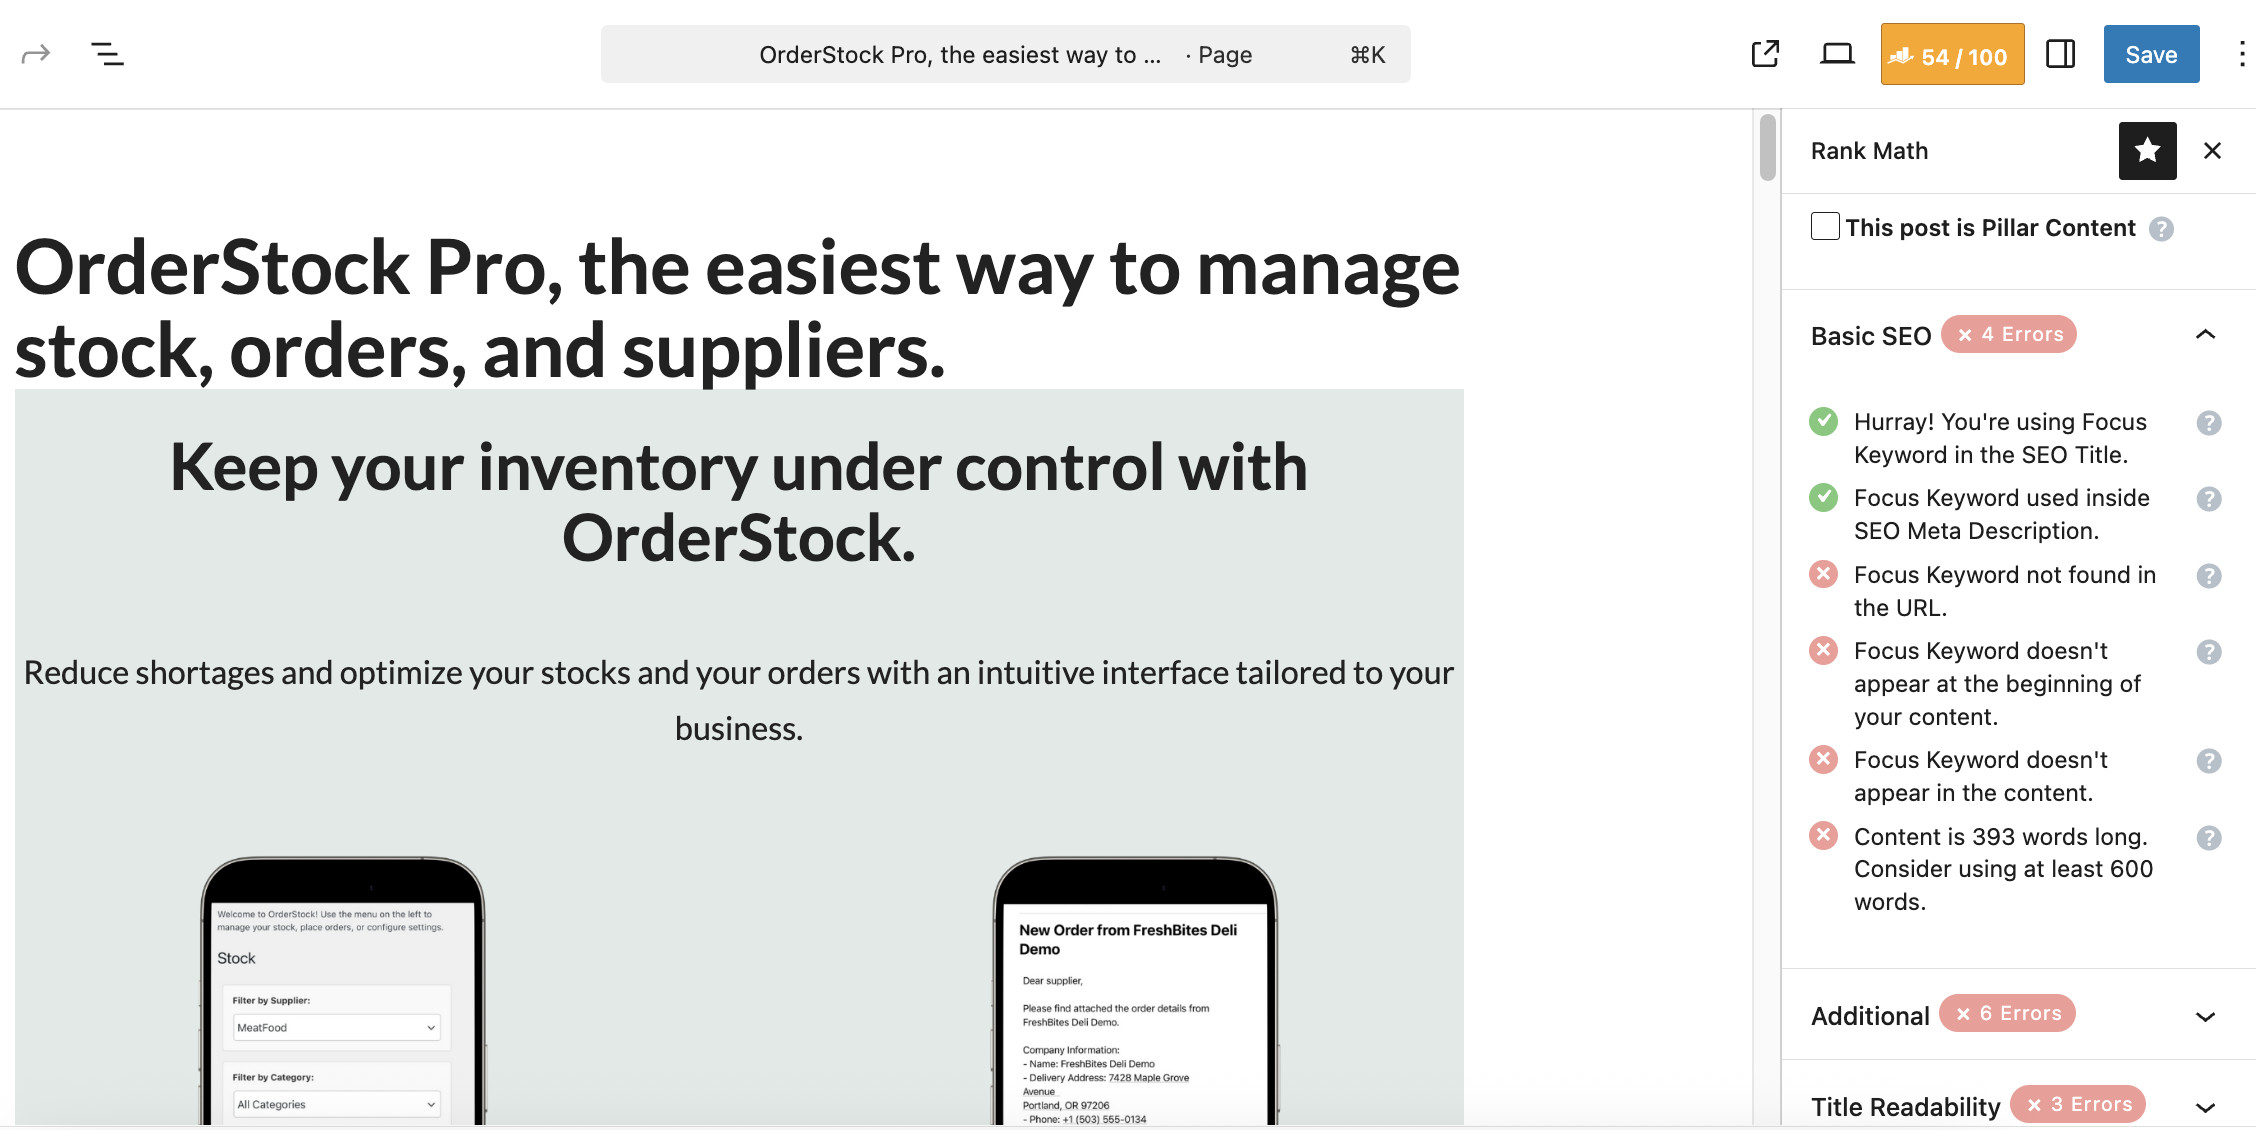
To improve my score, here are the optimizations I made:
- Hurray! You're using Focus Keyword in the SEO Title: already optimized with the addition of "manage stock" in the title, as mentioned previously.
- Focus Keyword used inside SEO Meta Description: already optimized, with a personalized meta description.
- Focus Keyword not found in the URL: Here, Rank Math reminded me that I needed to customize the slug (the permalink) of the page. In my case, I chose not to add "manage-stock" to my permalink, because this is a page presenting the features of my tool, and I want to keep the URL as simple as possible. However, for an article, I would of course have added the focus keyword to the URL.
- Focus Keyword doesn't appear at the beginning of your content: here, I have added the target keyword at the beginning of my content.
- Focus Keyword doesn't appear in the content: ditto.
- Content is 393 words long. Consider using at least 600 words: In the case of an article, it would have been possible to increase the word count, but since this is a kind of landing page, there's no point in adding more in my case.
Besides basic SEO recommendations, Rank Math also provides additional recommendations, in my case:
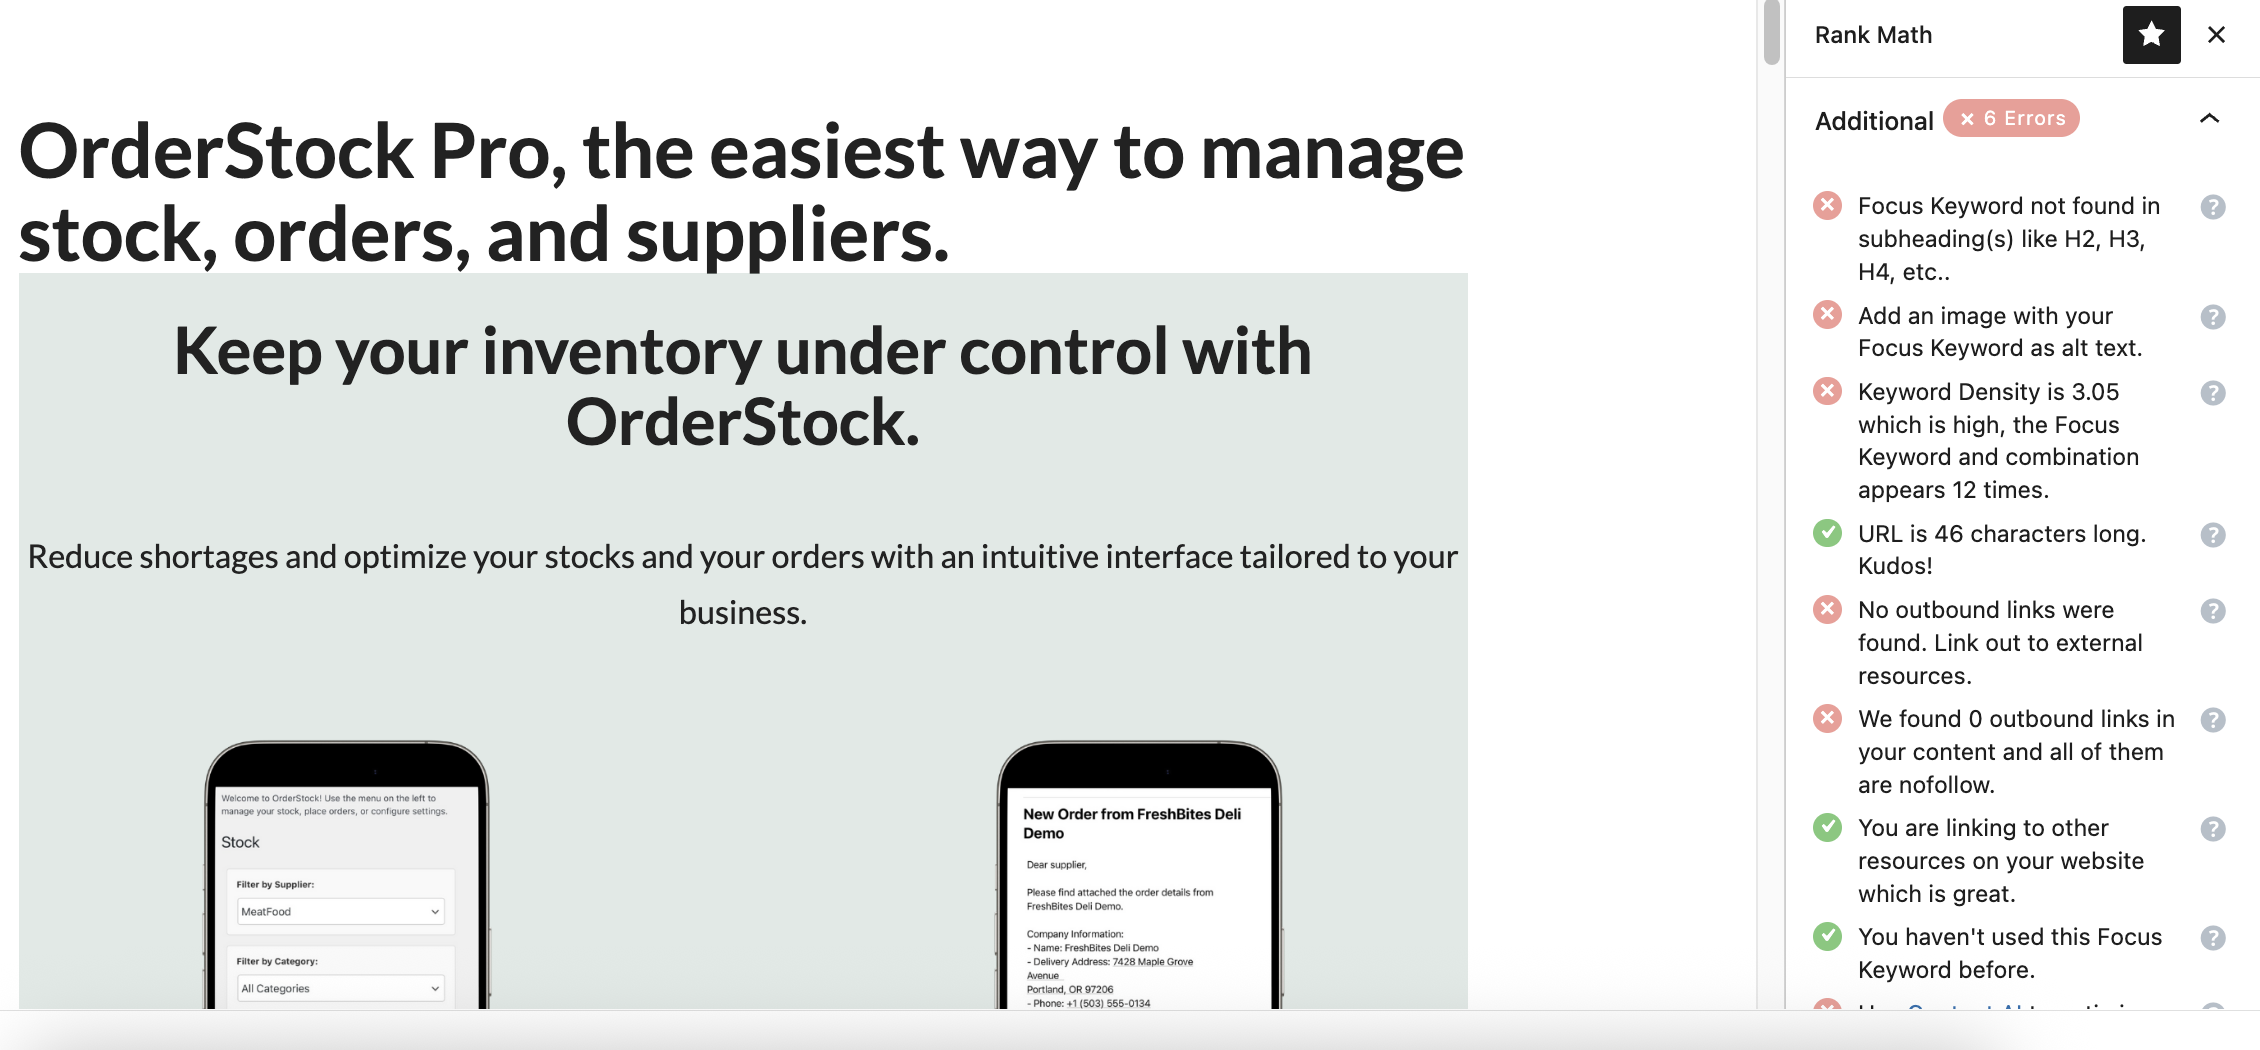
Indeed, without Rank Math, I hadn't realized that my target keyword, and in general certain important keywords that could describe my extension, were not recalled on the page. And for good reason, when you know your own product very well, you tend to underestimate the questions that prospects might ask, and not to formalize things, because you don't put yourself in the Internet user's shoes.
So here, thanks to Rank Math, I have:
- placed my important keywords in the content of my page, both in the headings and in the text;
- optimized alt text (description of an image that is read by screen readers for accessibility and used by Google to understand the content of the image) and added captions under each image;
- and made other minor optimizations.
As a result, I improved the SEO score, and reduced the number of warnings:
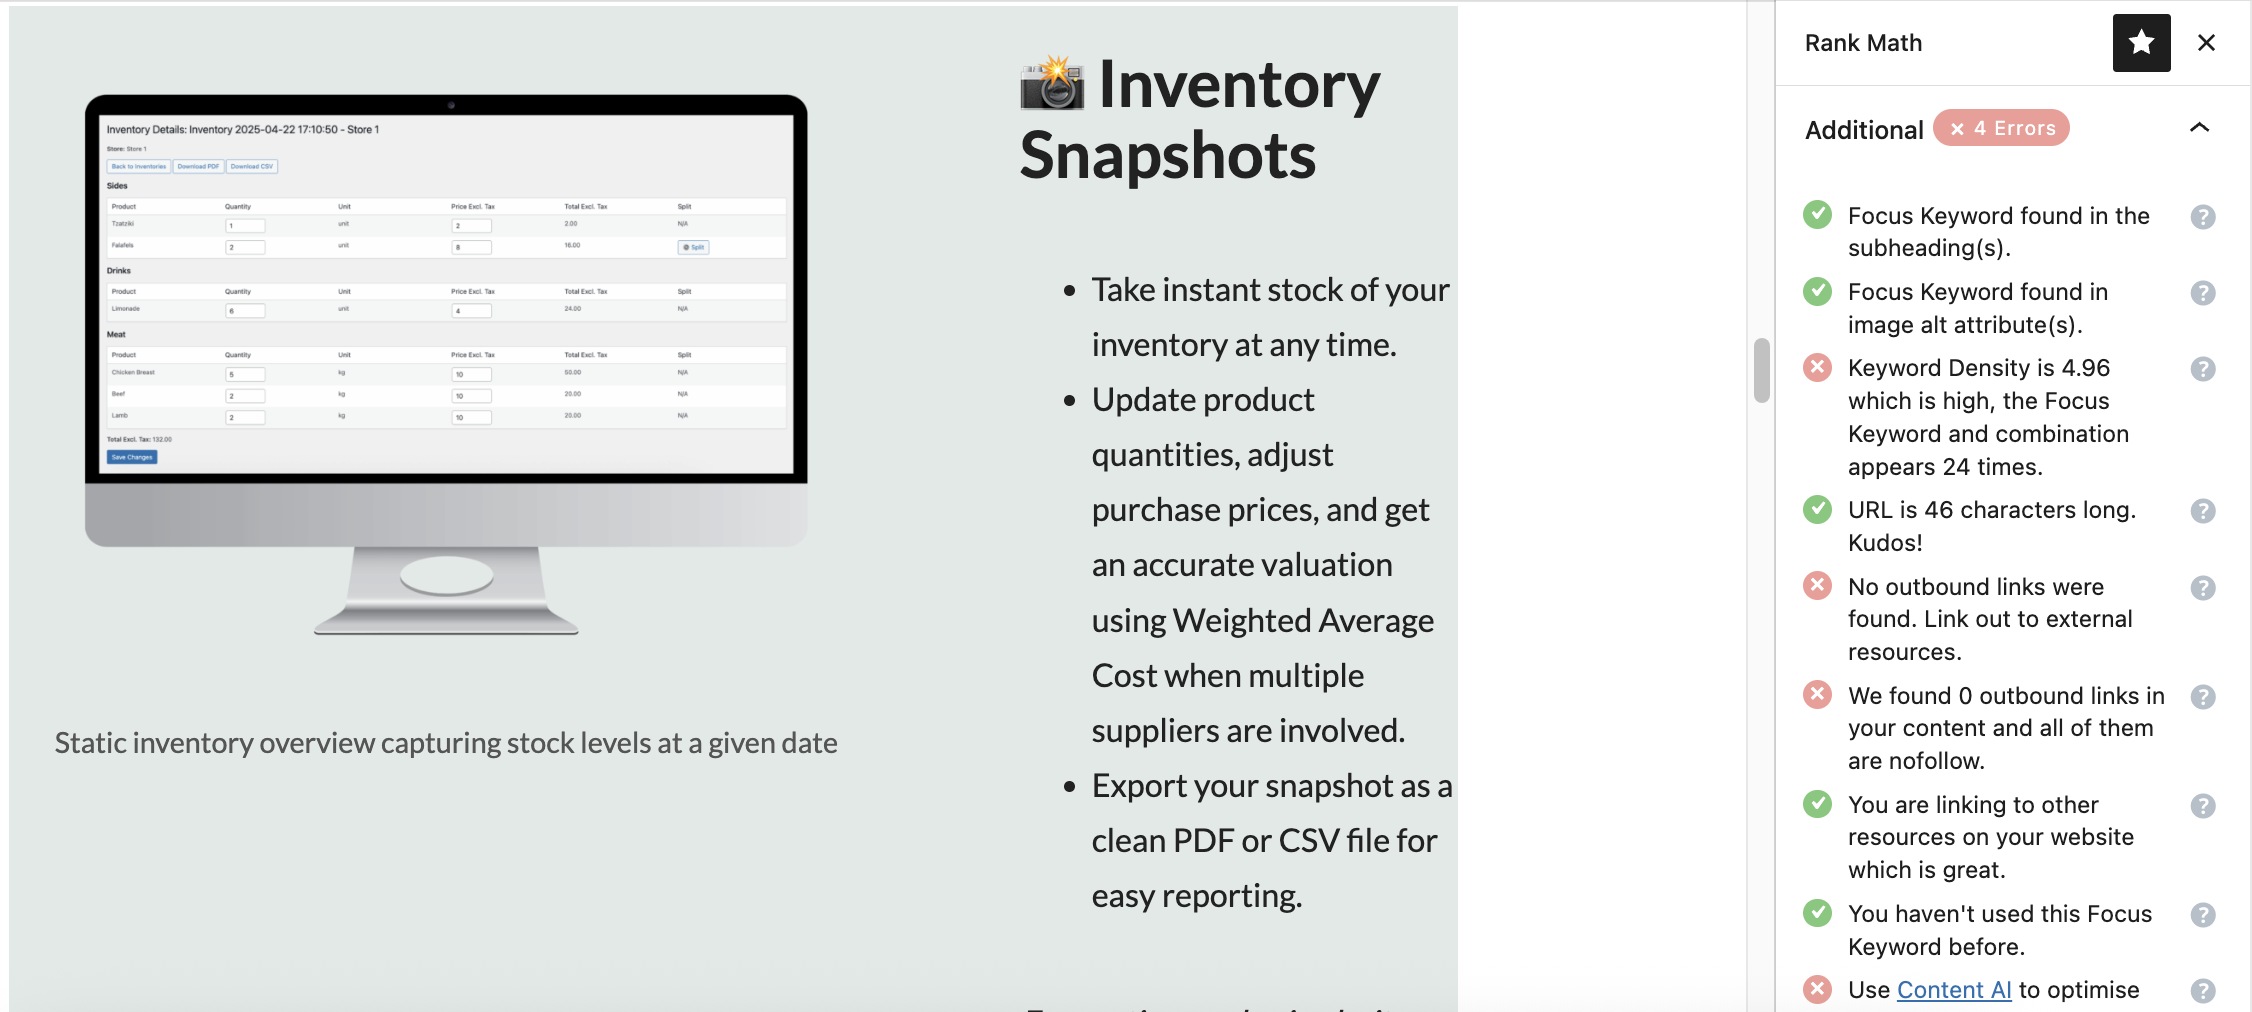
In my case, I didn't add any outbound links because it's kind of a landing page, but if it had been an article, adding links to reliable sources would have been quite helpful.
Finally, still in the Rank Math recommendations, we also find the “Title Readability” and “Content Readability” tab:
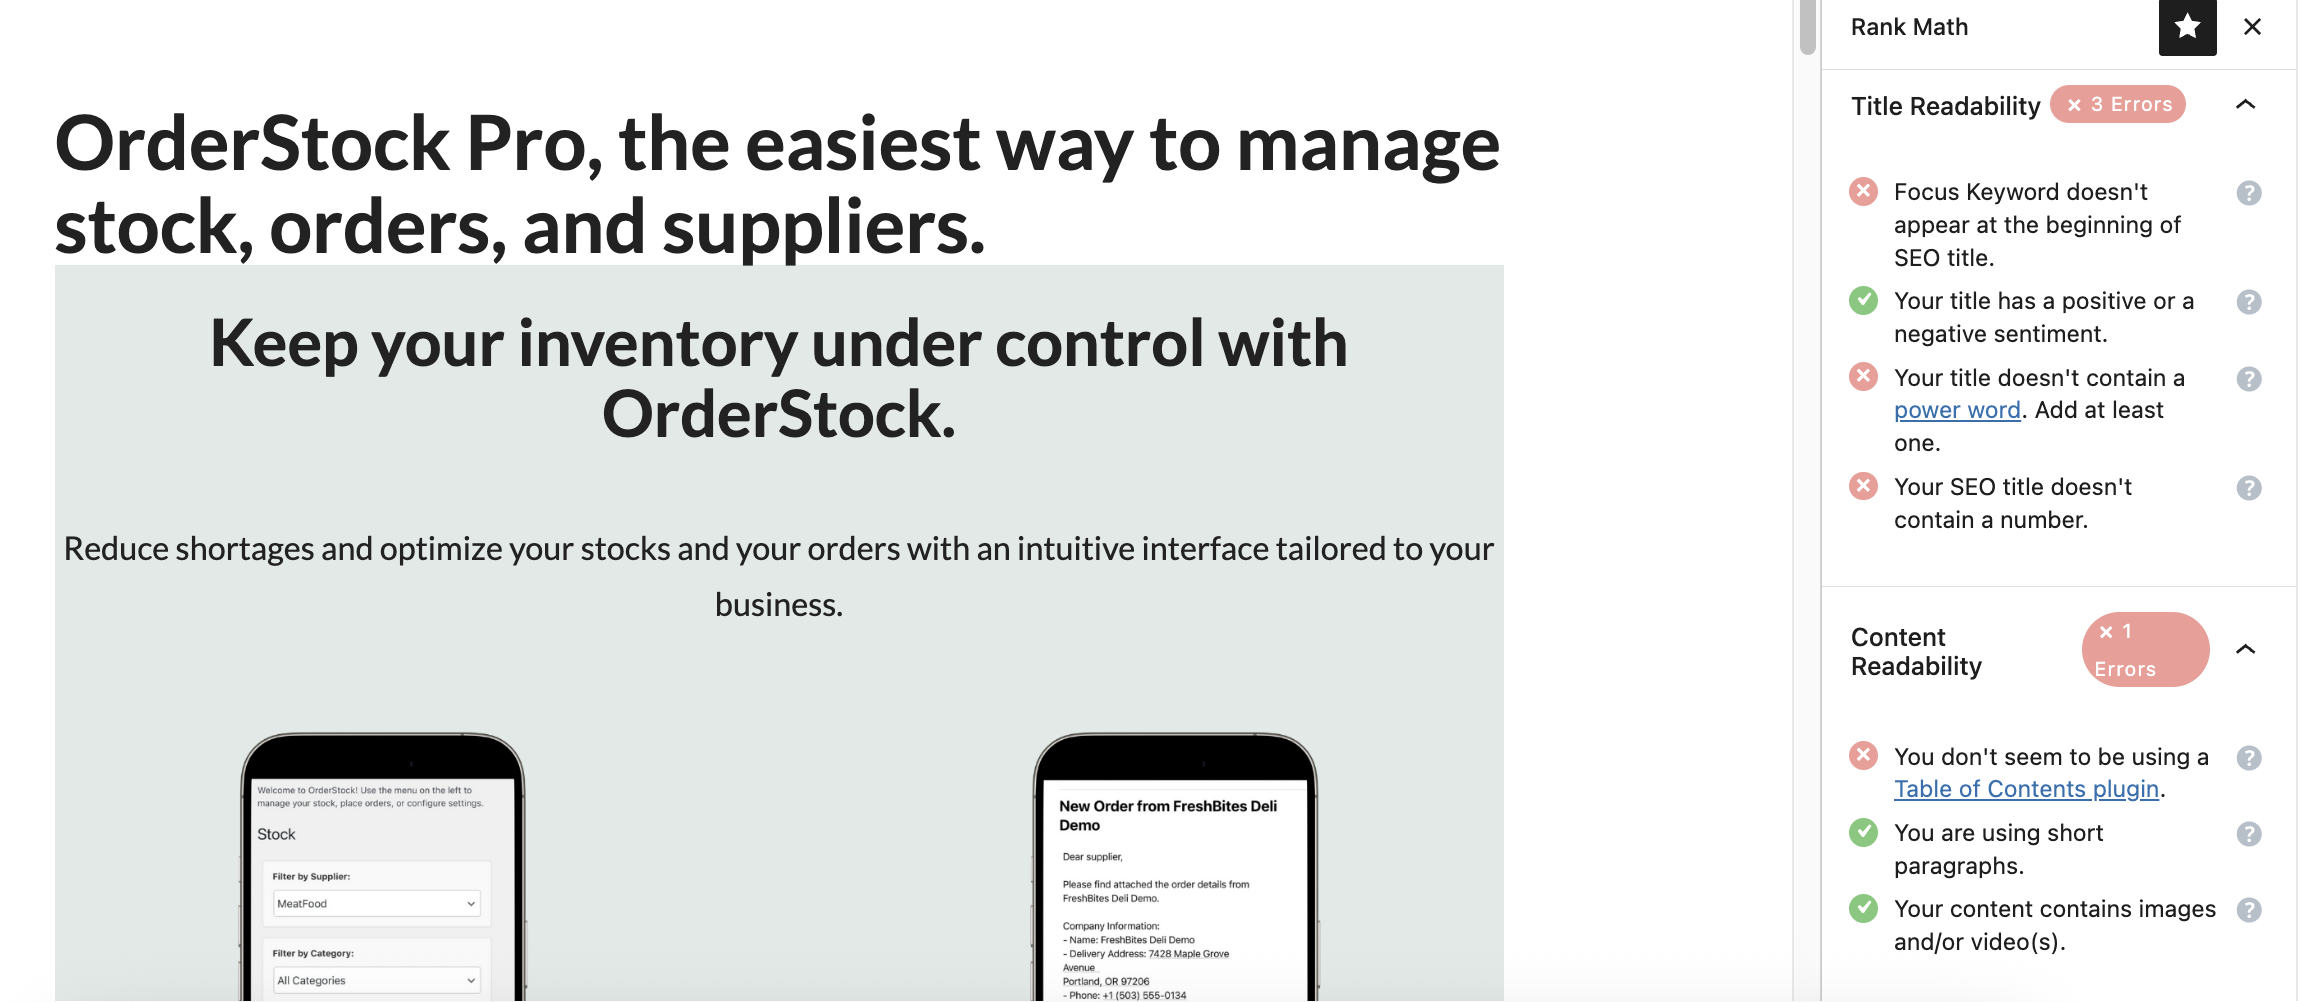
To further improve the score, we could:
- Replace the current title with "Manage stock, orders, and suppliers with OrderStock Pro." It's possible.
- Add what Rank Math SEO calls a Power Word. , that is, a word with strong emotional power. It would therefore be appropriate to add words like Effortless, Streamline, Powerful or even Seamless For example.
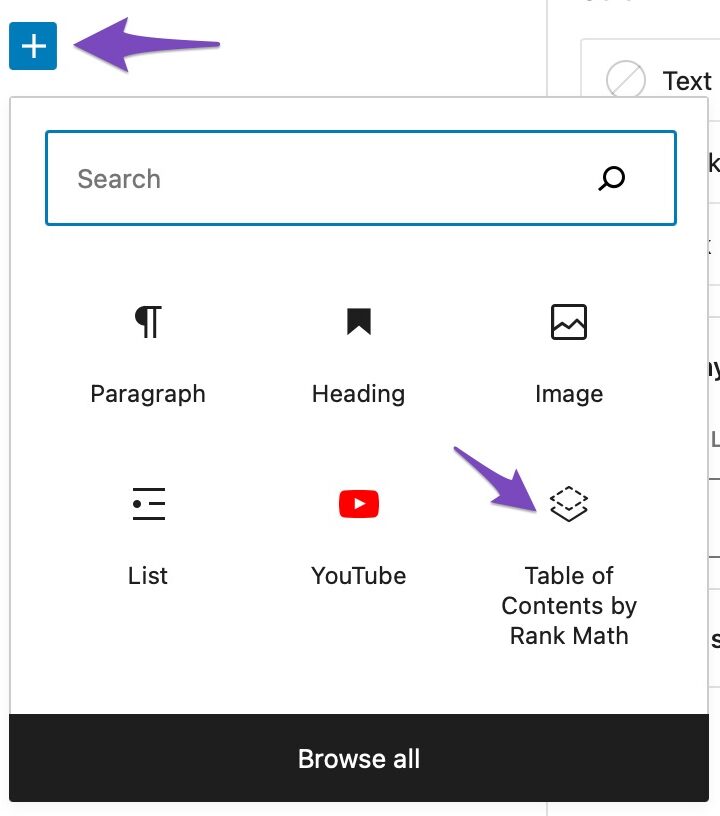
- Finally, Rank Math recommends adding a table of contents, which the extension offers via the addition of a block and that I have already planned in my blog articles.
Step 4: Configure Social Settings
-
In the tab Social, customize the title, description and image for Facebook/Twitter sharing.
-
Make sure the image meets the recommended dimensions (1200×630 px).
Step 5: Publish
Once your SEO score is satisfactory (ideally 70 or 80+), publish your article. Rank Math continues to monitor performance via Google Search Console.
We've covered most of Rank Math SEO's free features, but this extremely powerful plugin isn't limited to its free version. The extension offers a pro add-on that boosts its features and allows you to further optimize your site's SEO—essential for a commercial site with ambitious goals.
11. Advanced Features of Rank Math PRO
The PRO version of Rank Math unlocks powerful tools for advanced users and professionals. For my part, I opted for the Pro version for the official website of my restaurant chain in Paris, because I needed a powerful tool to improve the positioning of my restaurants on search engines.
Here are the main features:
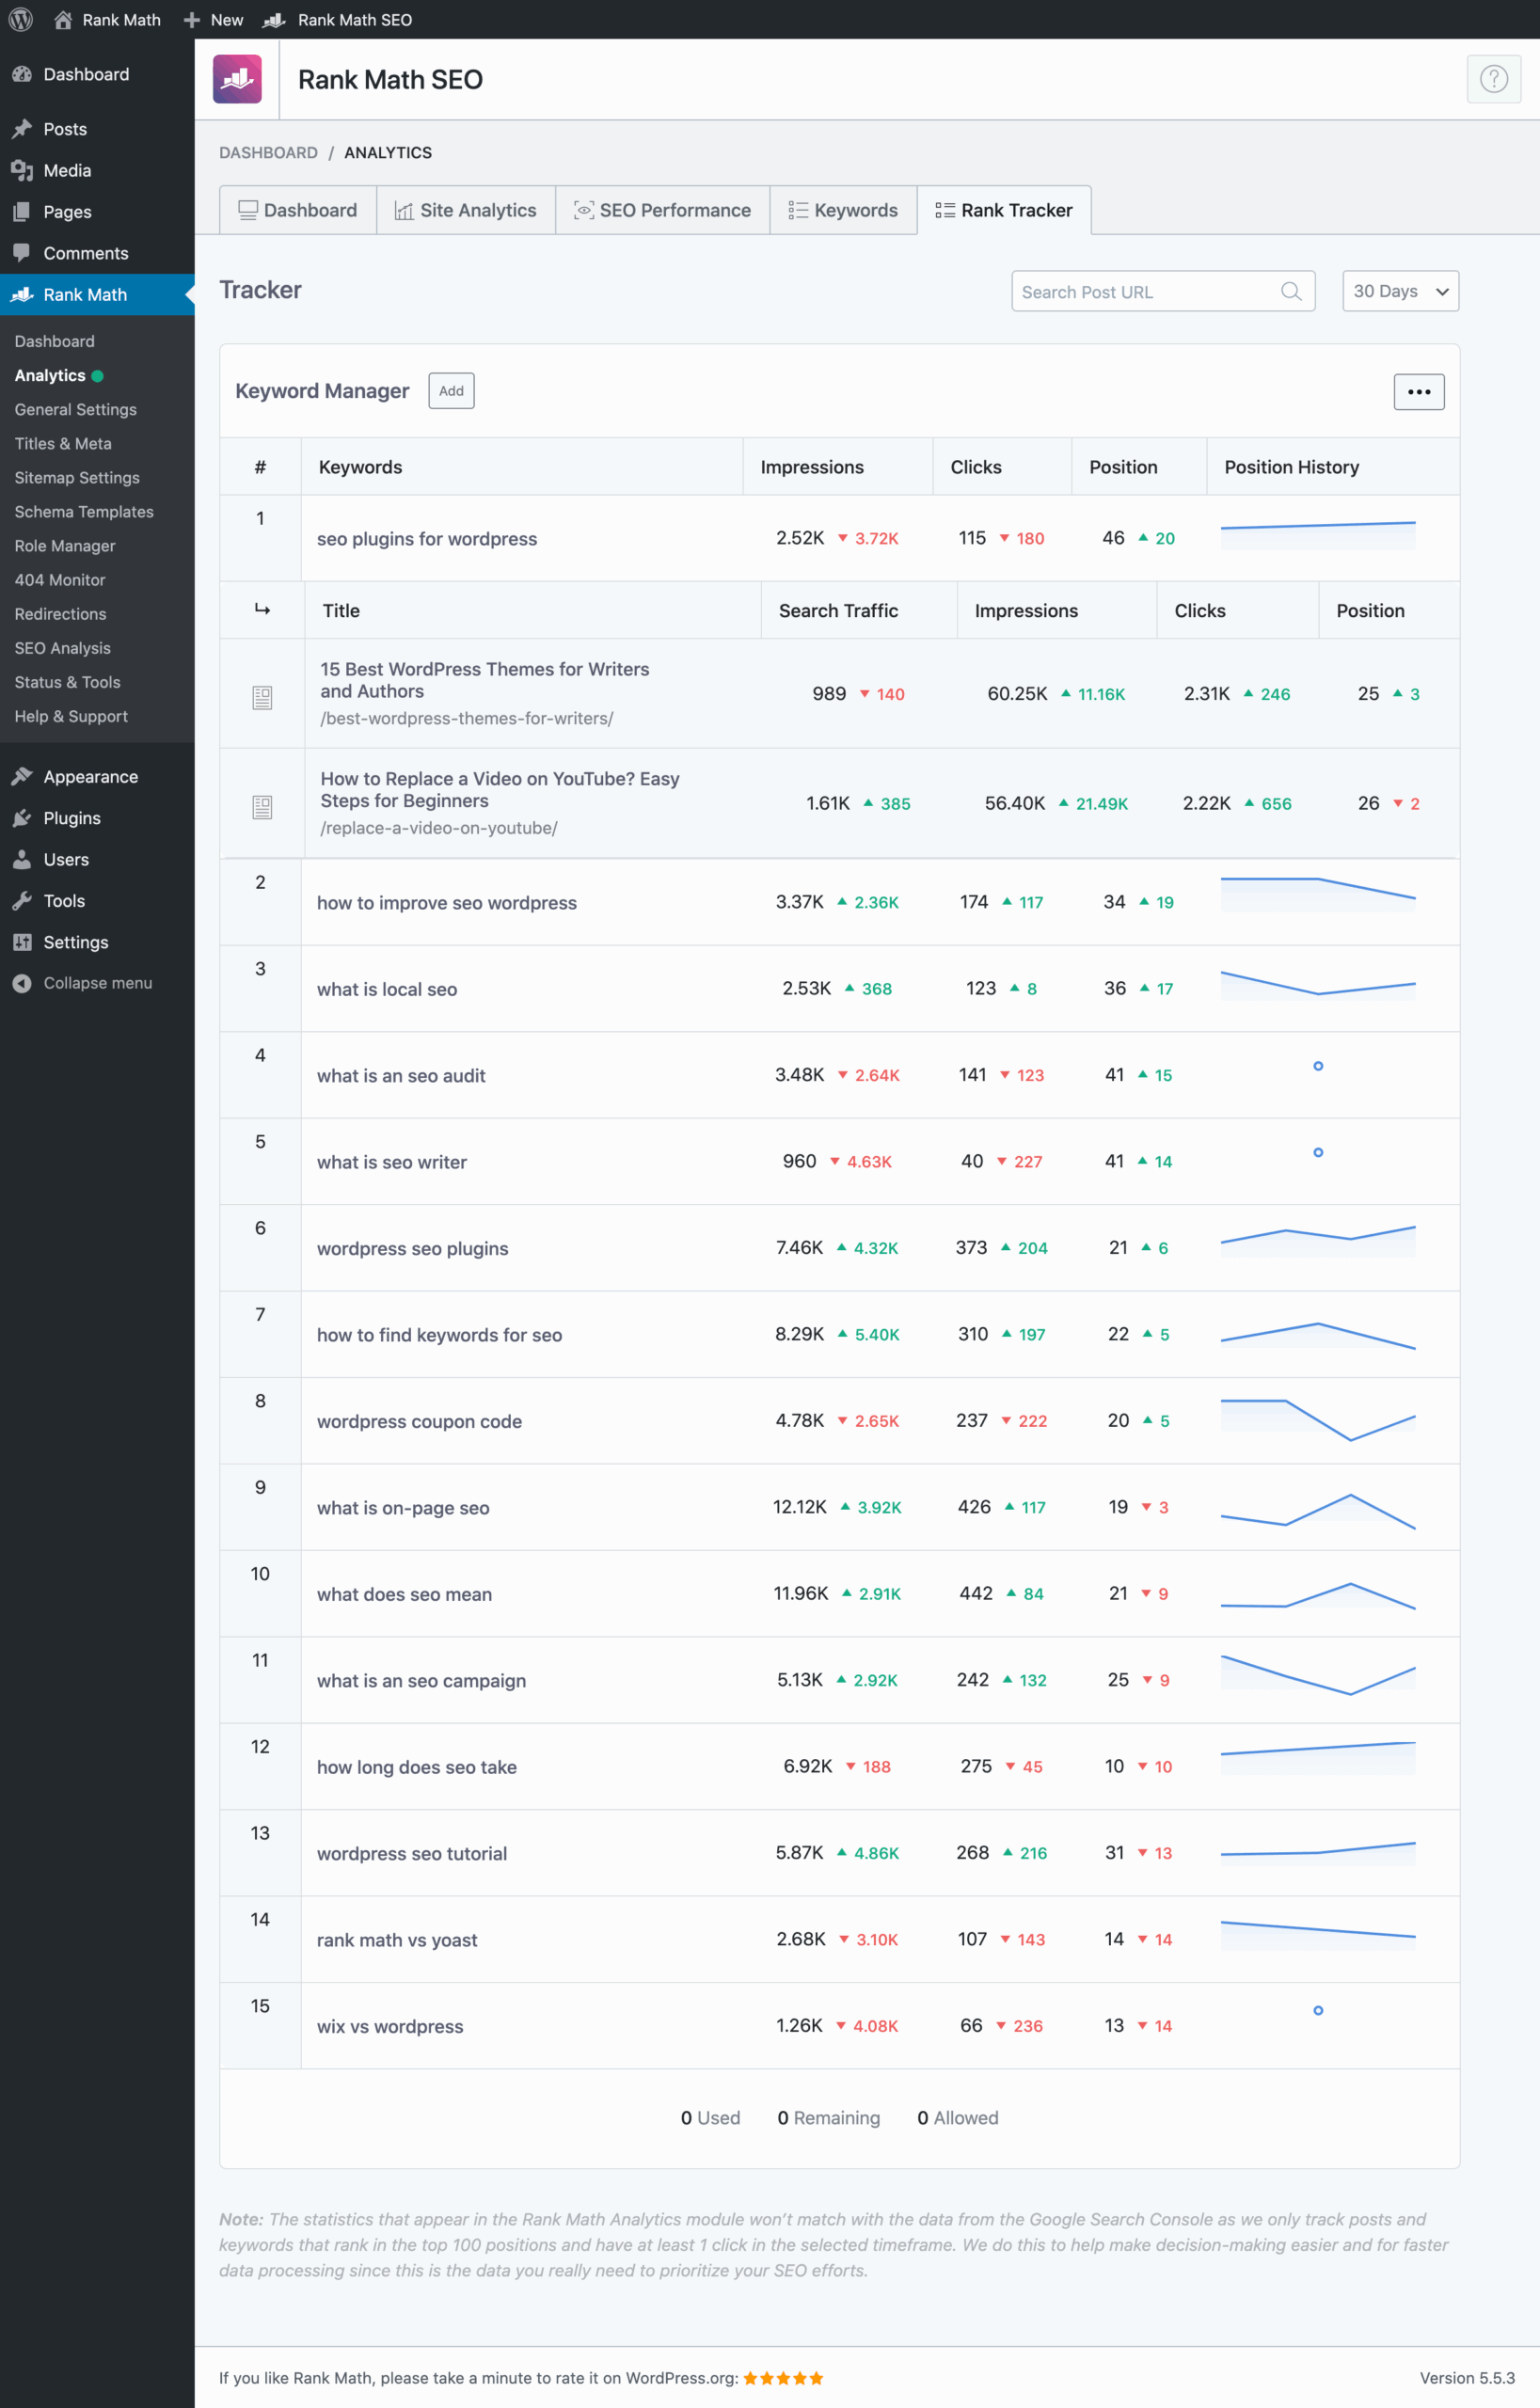
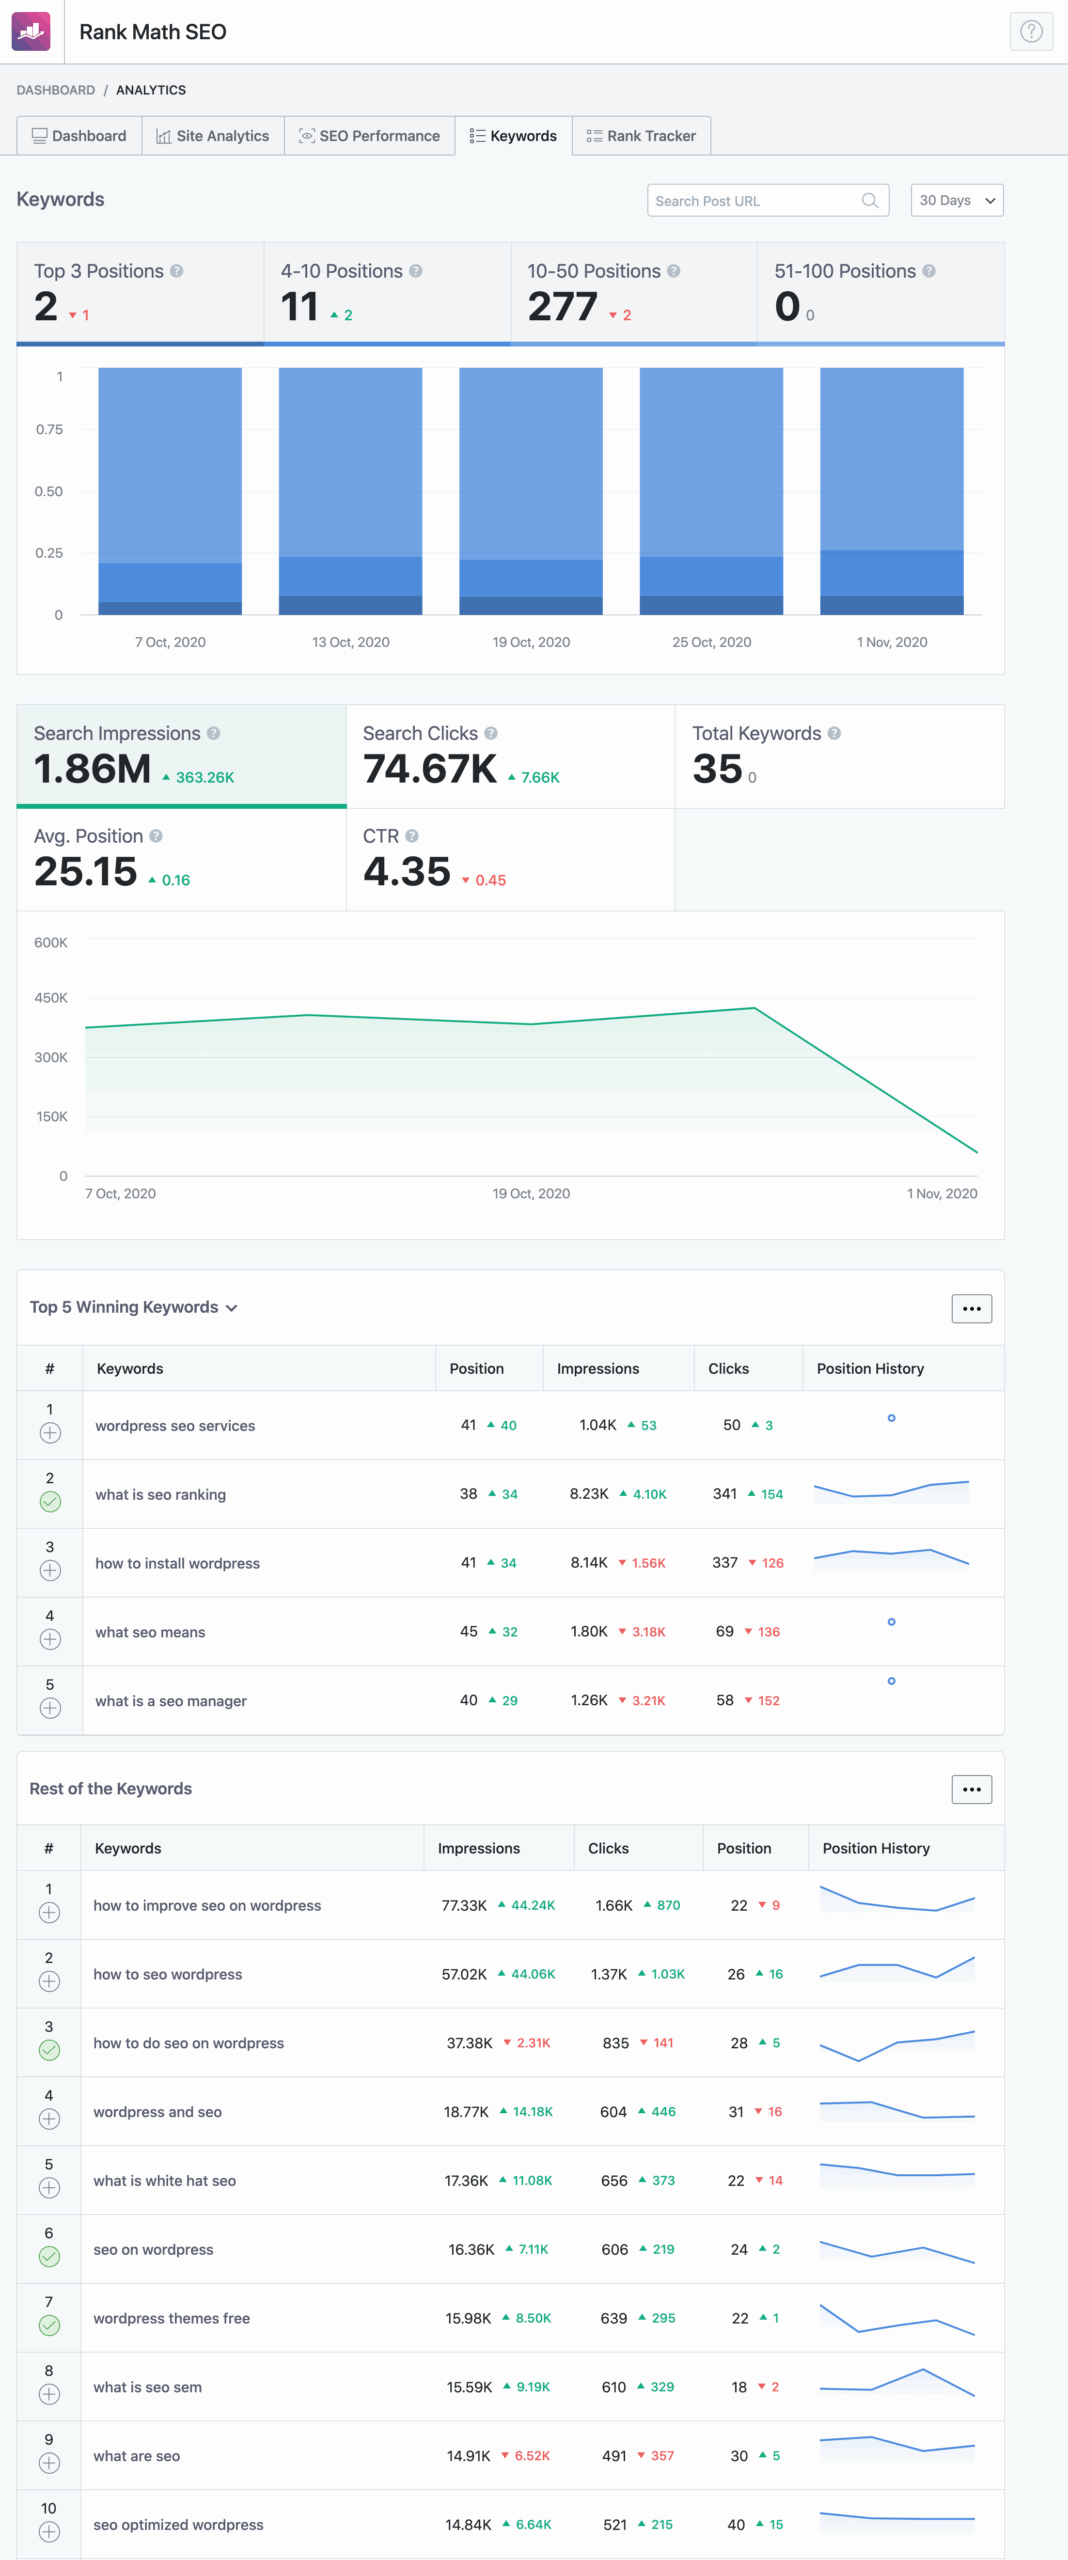
Keyword Tracking (Up to 500)
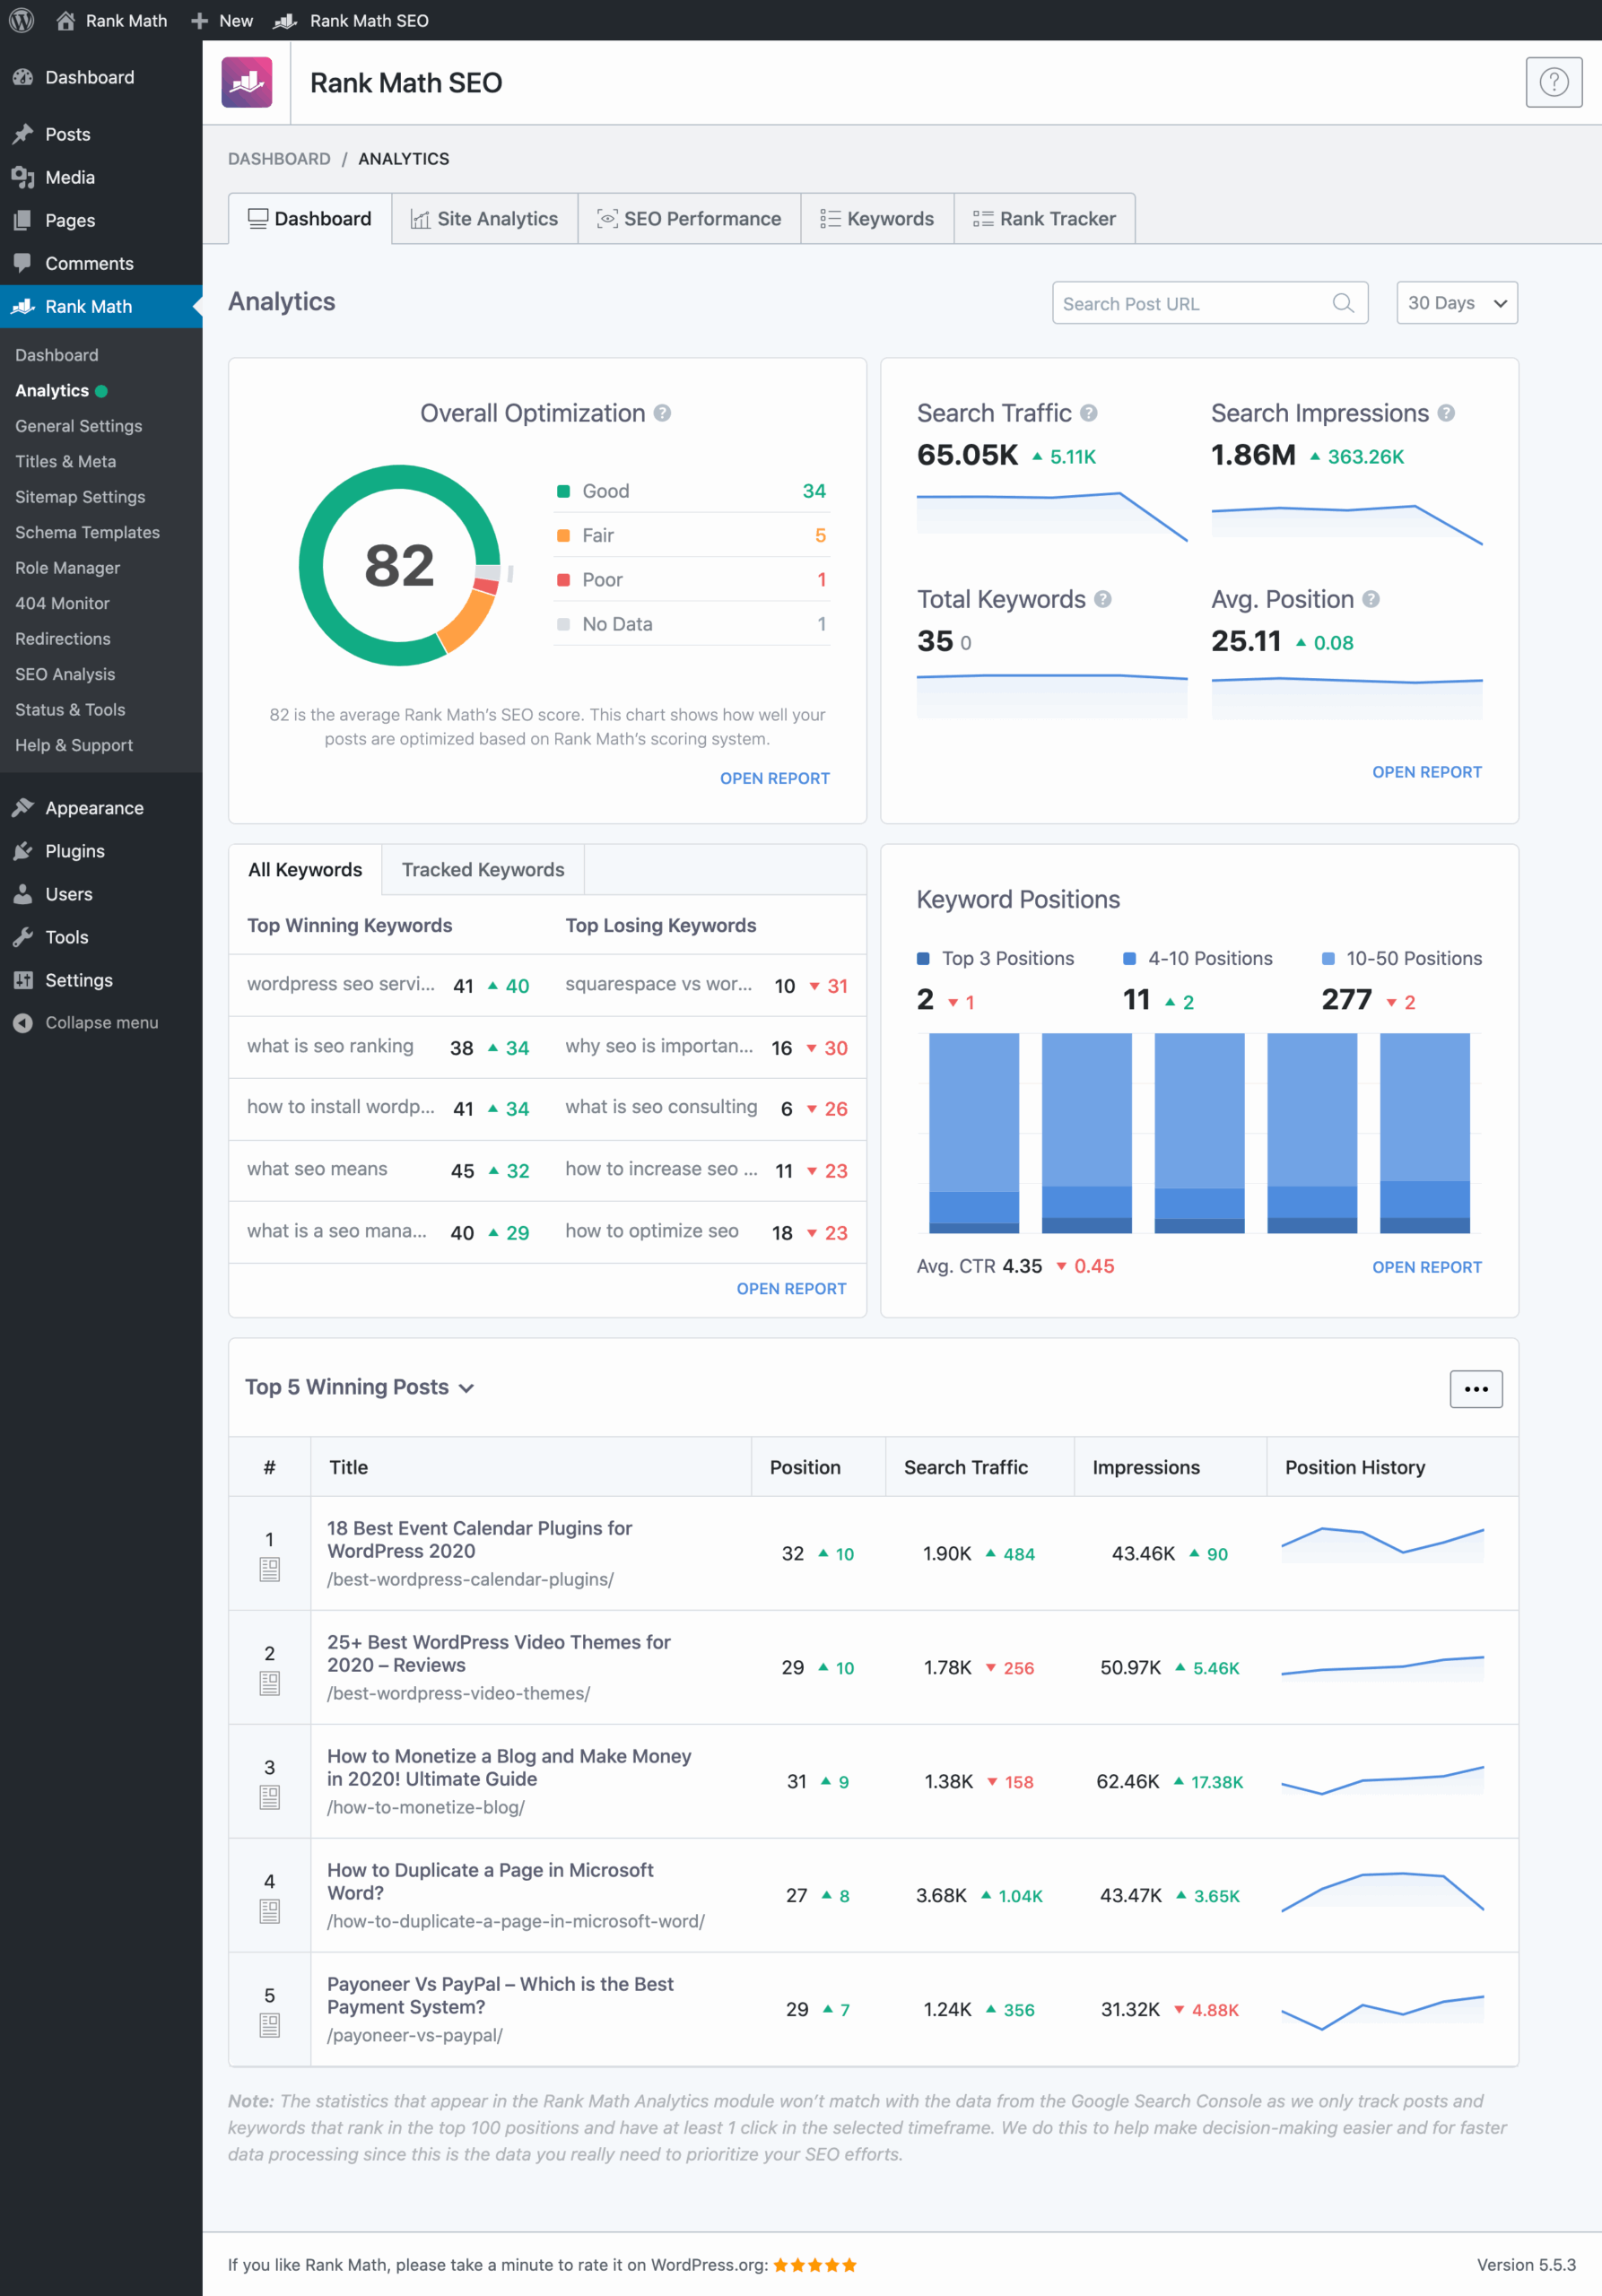
With this feature, you'll be able to truly occupy the top spots in search results. Rank Math SEO provides you with powerful, easy-to-understand statistics so you can improve your position in search engines based on the keywords you've set.
-
Track the position of up to 500 keywords in Google.
-
Analyze impressions, clicks, and click-through rates directly in WordPress.
-
Compare your performance with that of your competitors.
Advanced Schema Markup
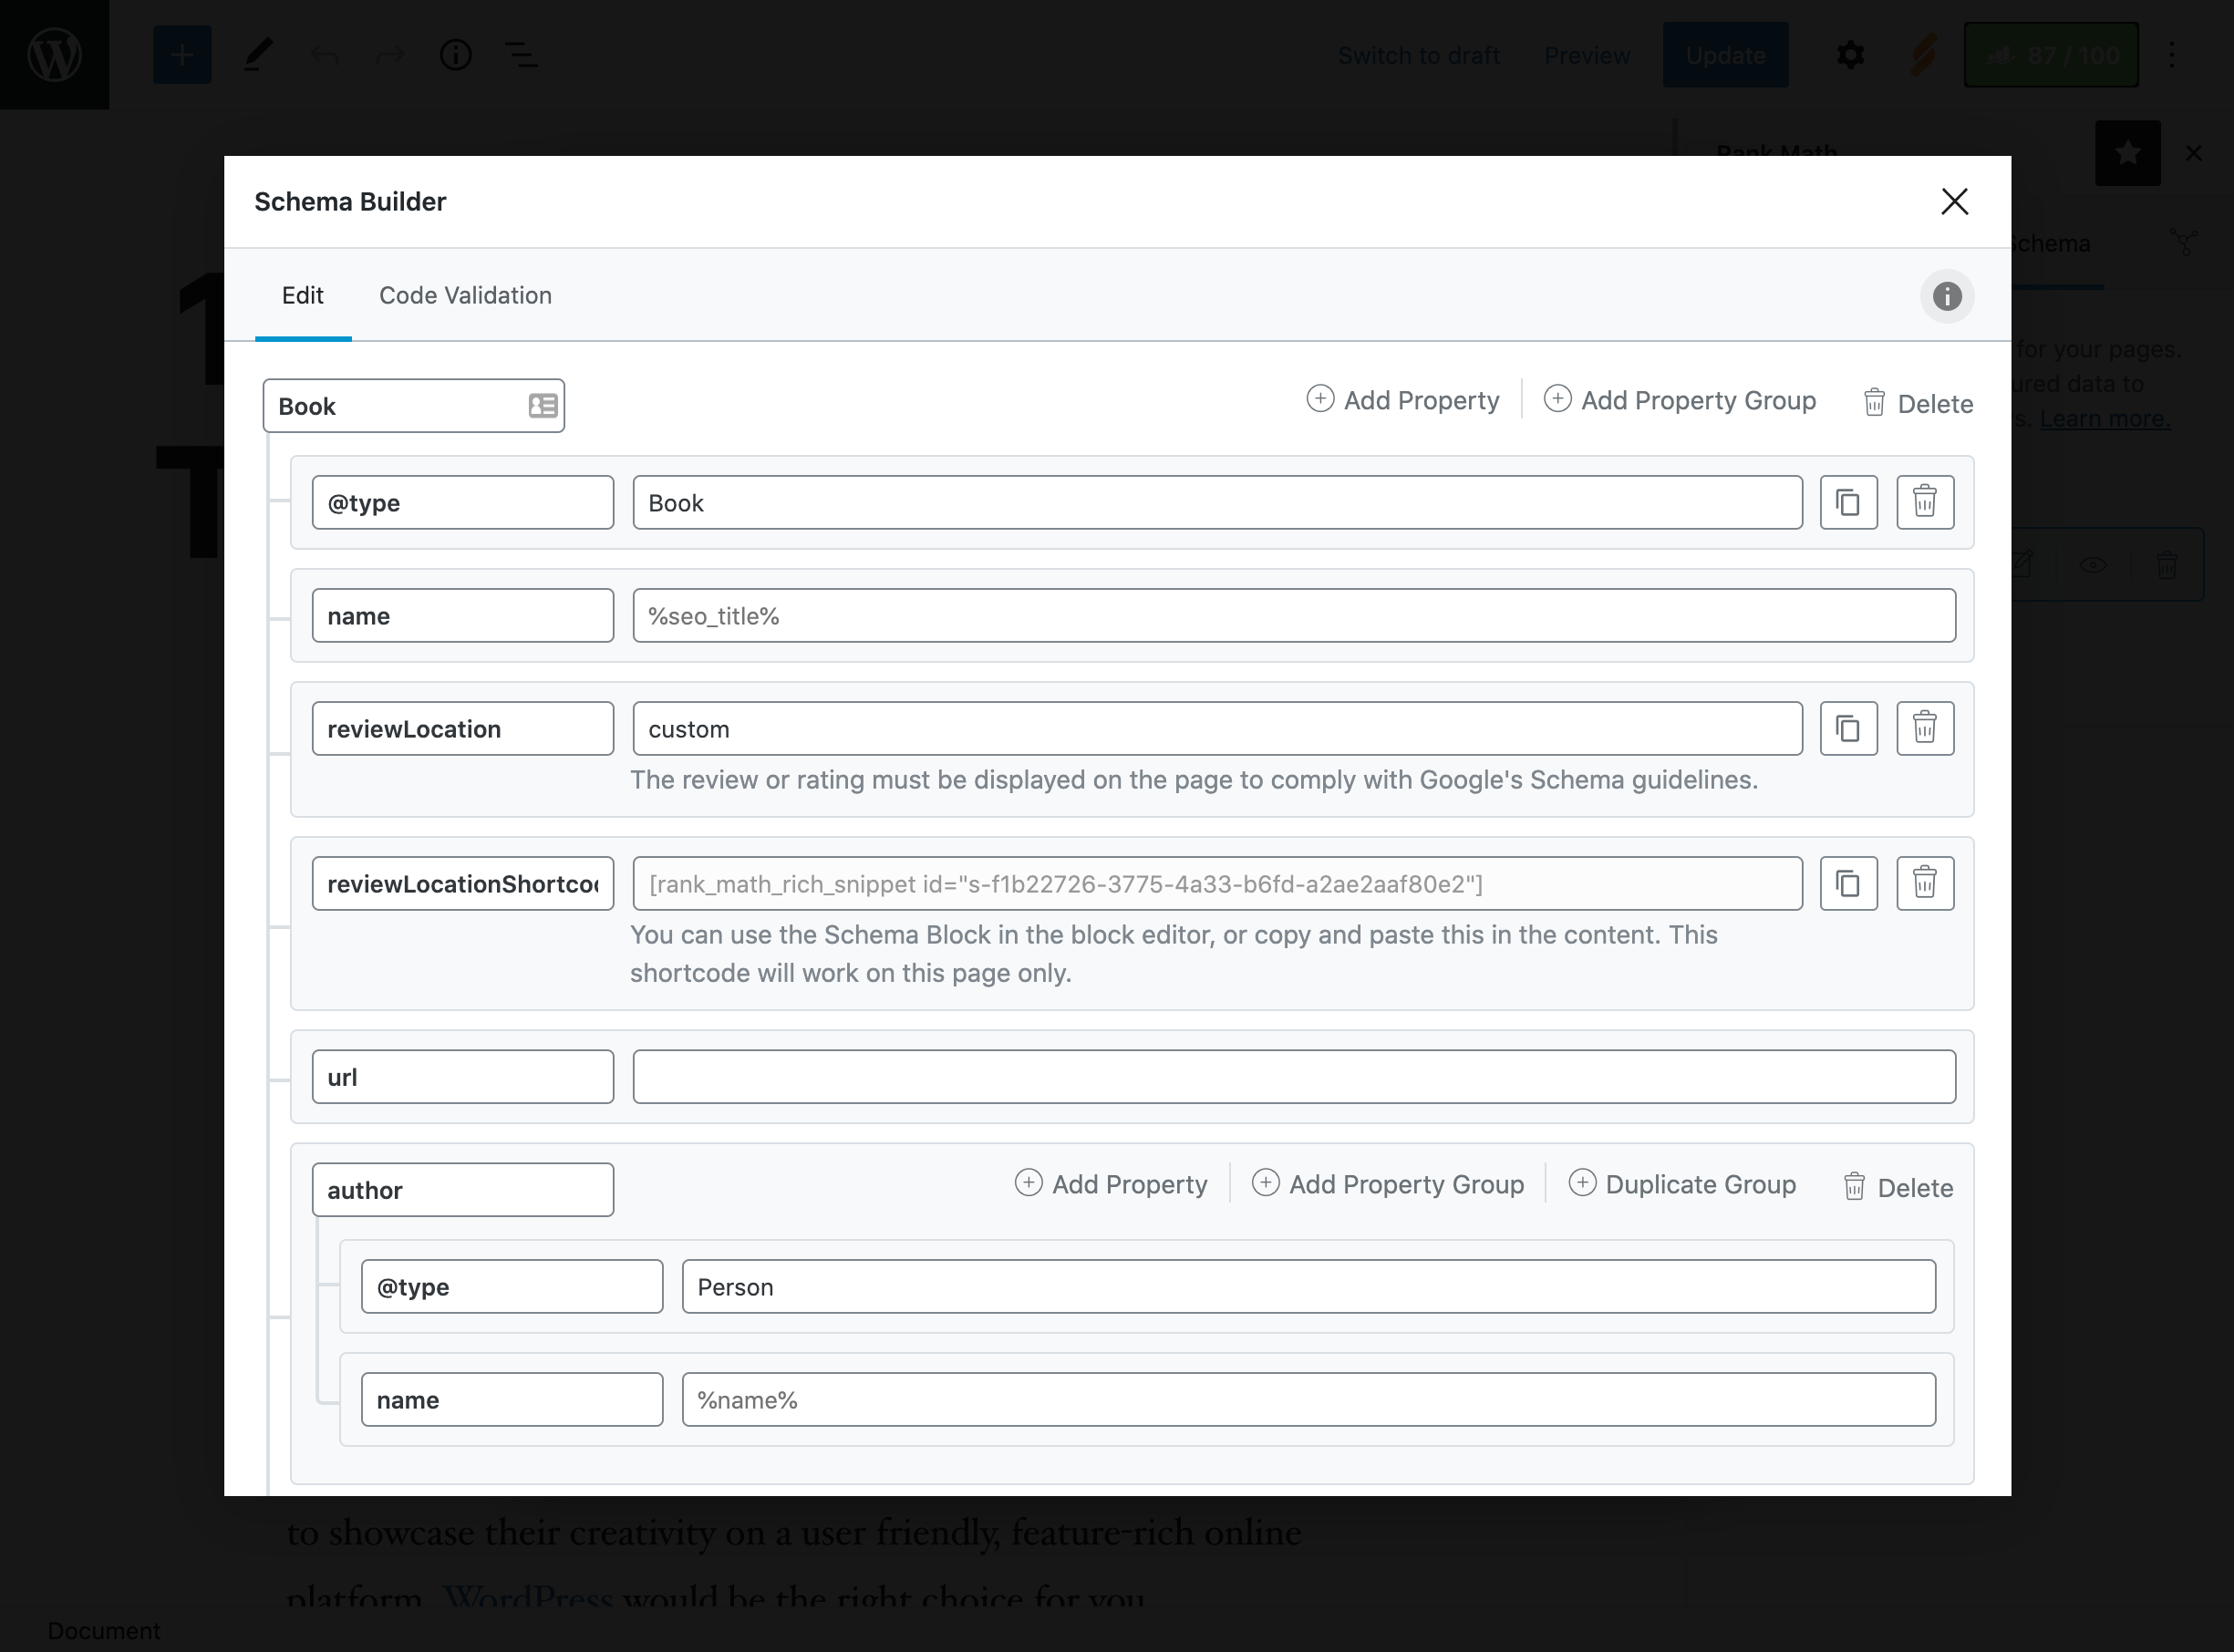
With this feature, you will be able to configure even more advanced Schema markup than with the free version of the plugin:
-
Access to a custom schema generator and automated templates.
-
Supports complex schemes like Event, Recipe, Or Product.
-
Import diagrams from other sites to save time.
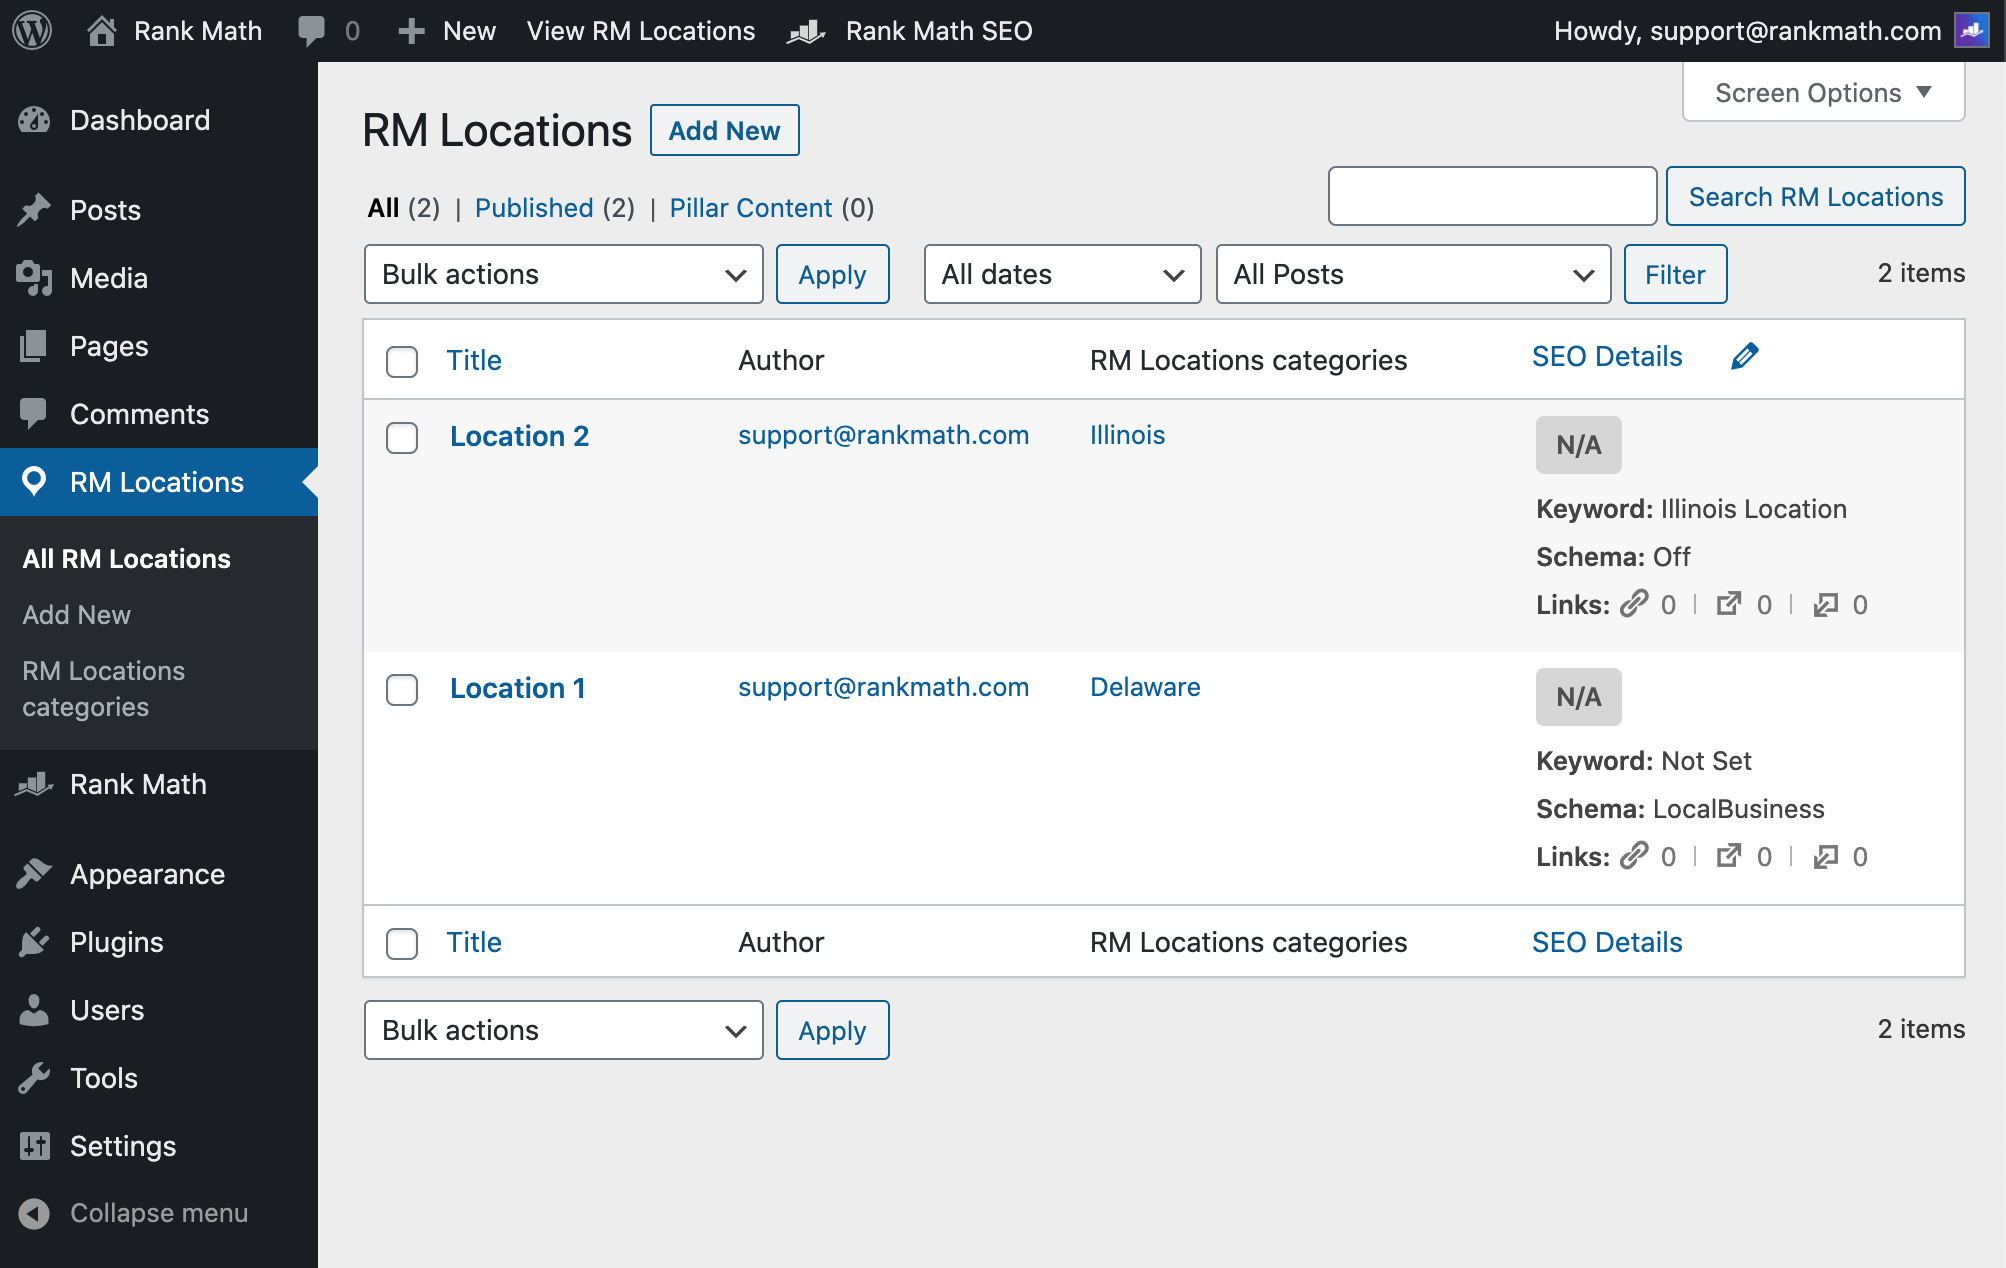
Improved Local SEO
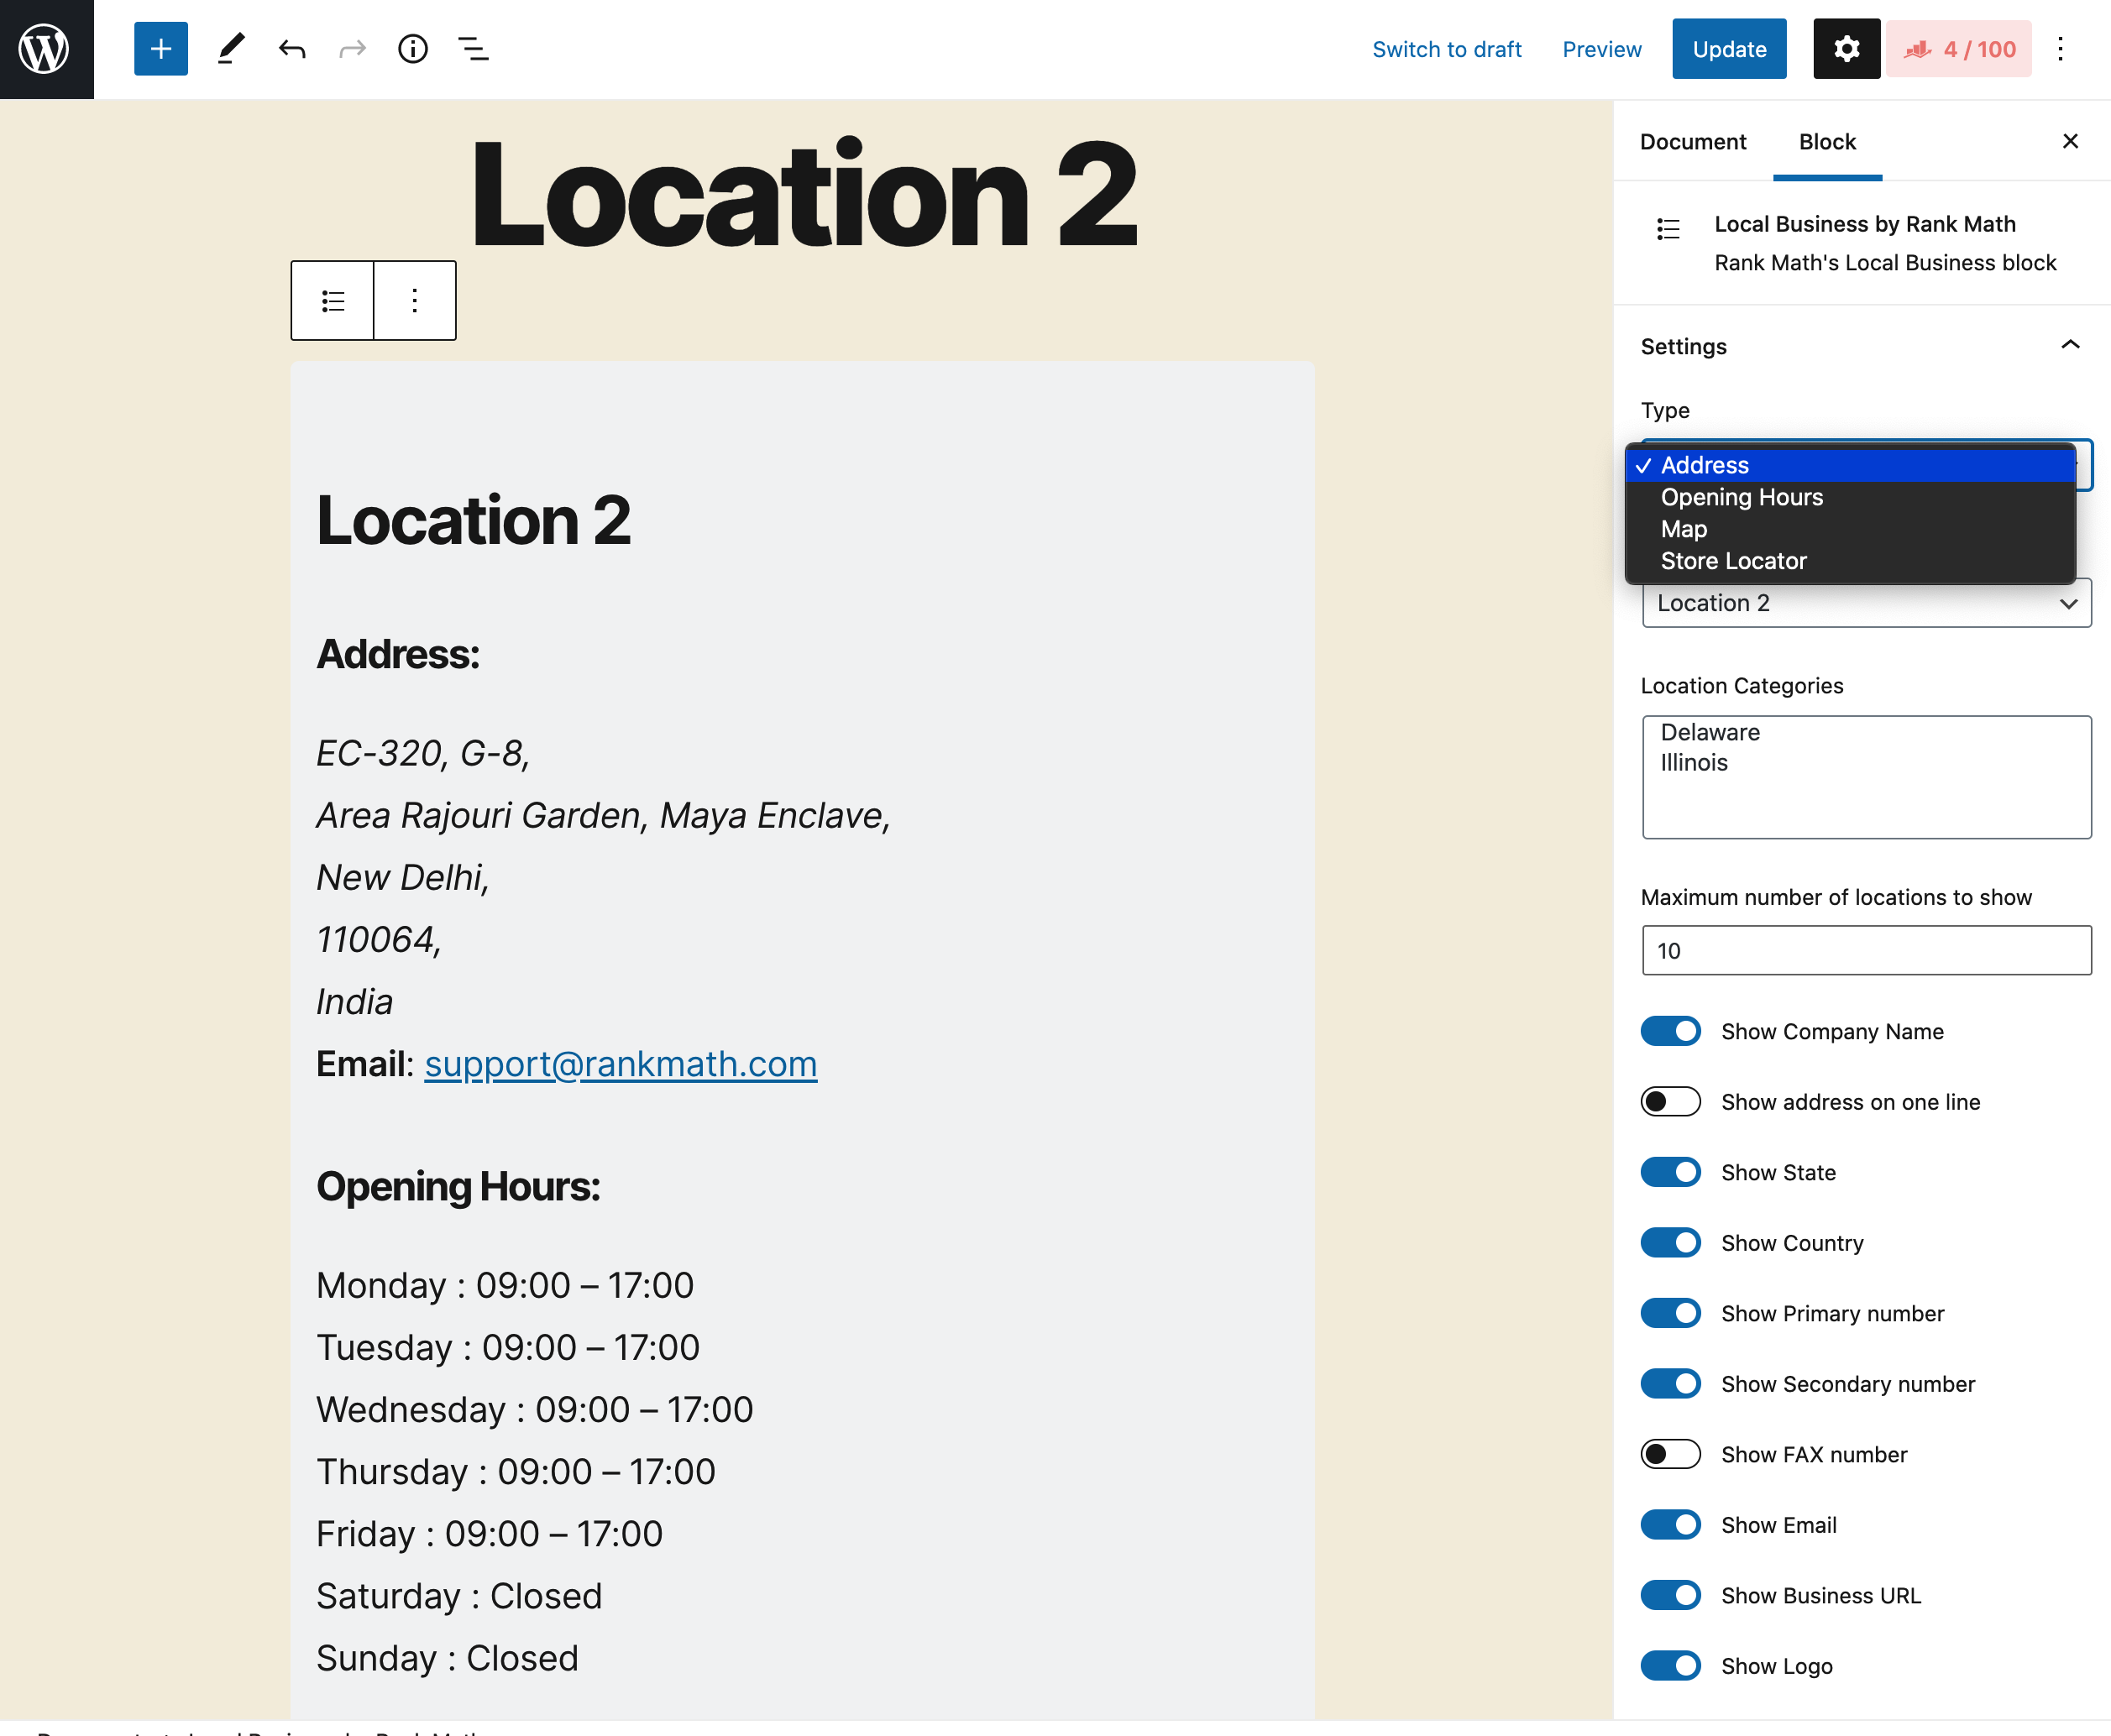
Here you will be able to refine your local SEO, to help your stores rank even higher on Google. With Schema markup, these options will be your best ally for displaying even more precise Rich Snippets, and with a better conversion rate.
-
Optimize for multiple locations with local metadata.
-
Add shortcodes to display up-to-date contact information (e.g. address, phone).
-
Ideal for brick-and-mortar businesses or franchises.
Advanced WooCommerce Integration
-
Automatically adds product schemas and SEO metadata.
-
Optimizes product pages for better ranking in Google Shopping.
In-Depth SEO Analysis
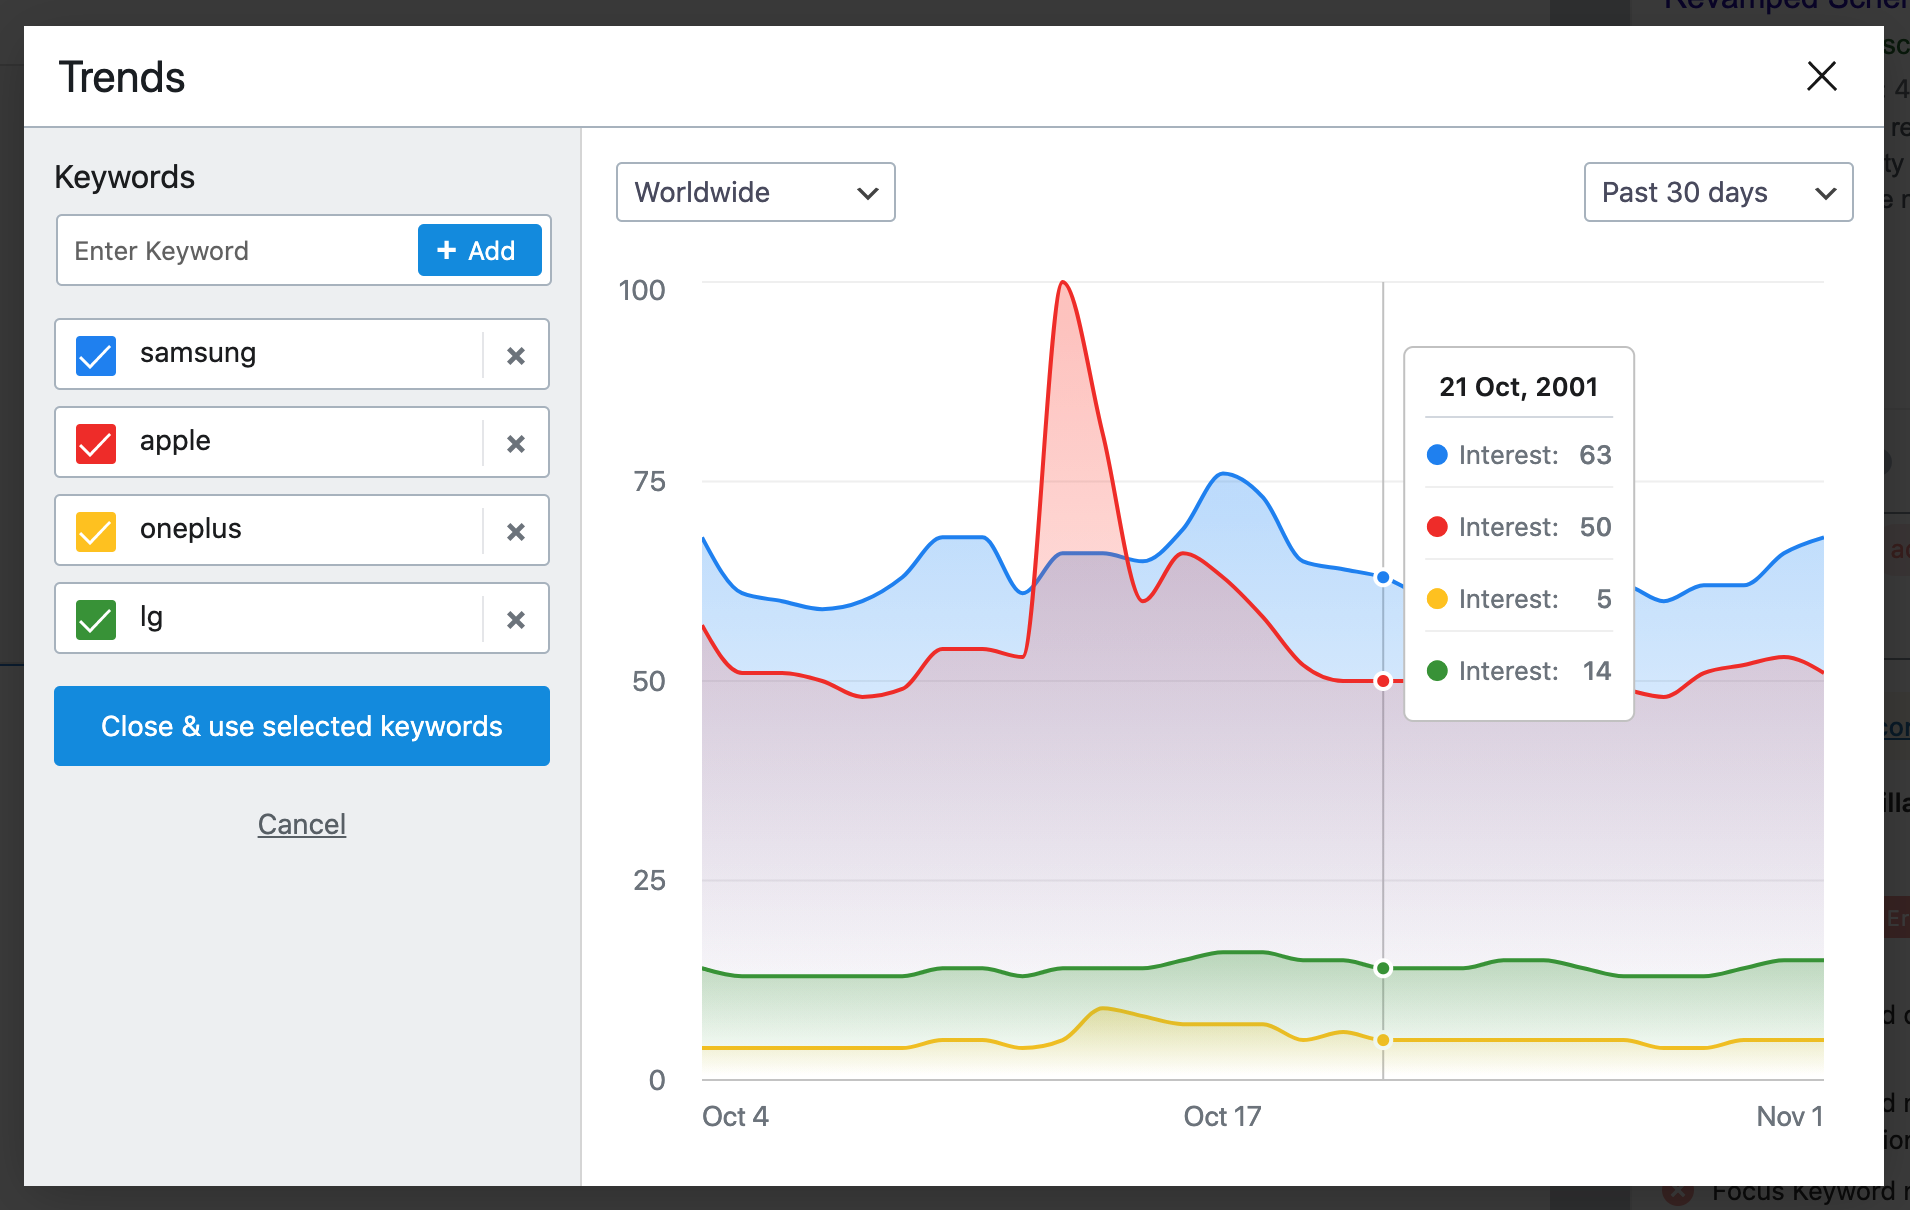
Still with the pro version, Rank Math SEO goes up a gear with extremely advanced statistics and reporting, such as Google trend statistics directly integrated into your WordPress dashboard. And that's not all. Rank Math SEO Pro also allows:
-
to carry out up to 70 SEO tests (compared to 30 in the free version);
-
to provide detailed recommendations for technical performance.
Content AI (Artificial Intelligence)
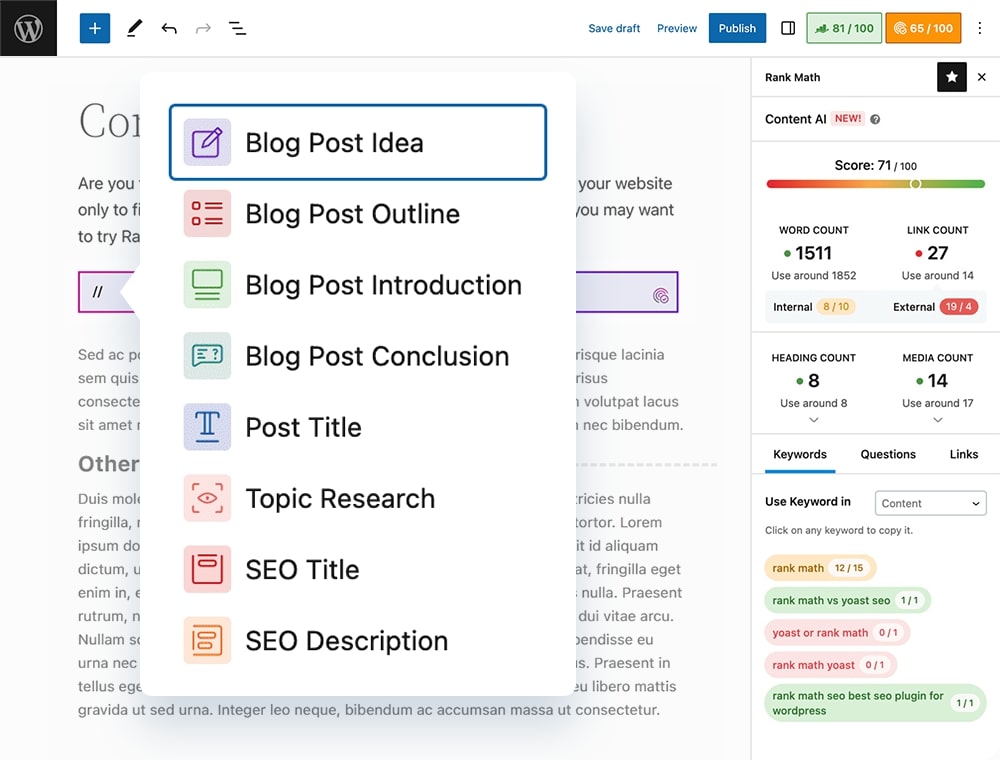
This feature is one of Rank Math SEO's best features. Thanks to Artificial Intelligence, you'll be able to boost your content creation, article titles, and recommendations.

-
Generate content ideas, introductions, product descriptions or entire SEO-optimized articles.
-
Enter a keyword and a title, and the AI creates relevant content.
Video and News Sitemap (PRO)
-
Create specific sitemaps for videos or news sites.
-
Improves indexing of multimedia content.
Other pro features
Here is an additional list of features enabled by Rank Math SEO in the pro version:
- White-labeled email reports to send to your clients, very useful if you are an agency for example.
- A sitemap is required to be in Google News.
- A super useful image SEO tool to further optimize your images on your website.
- And many other tools, the list of which you will find here.
To view prices, visit the official website.
12. Why Upgrade to Rank Math PRO?
The free version of Rank Math is excellent for beginners, but the PRO version offers exceptional value for money for:
-
THE professional bloggers who want to track hundreds of keywords.
-
THE WooCommerce stores.
-
THE agencies managing multiple sites (Business and Agency licenses available).
-
THE local sites targeting a specific geographic audience, such as restaurants, restaurant chains, bakeries, coffee shops, and physical stores in general.
Compared to Yoast SEO Premium (99 $/year for one site), Rank Math PRO is more affordable and supports an unlimited number of sites. Plus, features like Content AI and keyword tracking are unique.
Ready to boost your SEO? Try Rank Math PRO today.
13. FAQ
Is Rank Math better than Yoast SEO?
Rank Math offers more free features and a more modern interface. Yoast is more established, but Rank Math is often preferred for its flexibility and affordability (especially the PRO version).
Is the free version enough?
Yes, for small sites or beginners, the free version covers the essential needs (content optimization, sitemap, Schema, etc.).
How to upgrade to Rank Math PRO?
Download the pro add-on from the official website, then install the PRO plugin (in addition to the free plugin) from Extensions > Add. Activate your license in Rank Math SEO > Dashboard, and start optimizing your SEO!
Can I migrate from another SEO plugin?
Yes, Rank Math automatically imports settings from Yoast, All in One SEO, and other plugins without affecting your ranking.
14. Conclusion
Rank Math SEO is a must-have tool for optimizing your WordPress site, whether you use the free or PRO version. The free version offers powerful features for beginners, while the PRO version transforms your SEO strategy with advanced tools like keyword tracking, Content AI, and automated Schema Markup. By following this tutorial, you can set up Rank Math in minutes and start improving your visibility on Google.
Want to go further? Download Rank Math SEO in free or pro version!
Feel free to share your tips or questions in the comments! 🚀
👇 Continue with the next chapter:
Chapter 8: Automate and monitor your AI visibility
📘 Or find the complete summary of the guide “SEO for AI”.
